CloudStack
Preparation
Server-side client (cloudstack-* CLI) requires apache-libcloud.
It can be installed with pip. The version should be the same as
defined in slipstream.sixsq.com:SlipStream:pom.xml with
libcloud.version property.
Installation
You can install the CloudStack connector with:
$ yum install slipstream-connector-cloudstack
You will need to restart the SlipStream server to make this connector visible.
Configuration
To allow users to take advantage of this connector, you must add one or more instances of this connector by either:
- Using the UI.
- Drop a configuration file and restart the service.
With the UI
Instanciate one or more instances of the connector
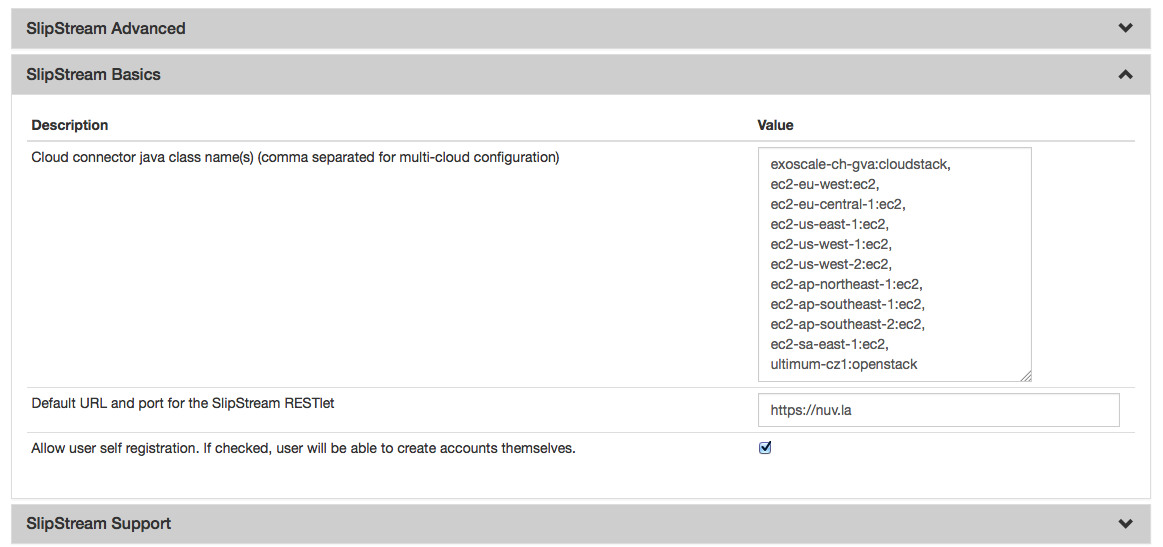
Once logged-in with a privileged user (e.g. super), open the configuration page by clicking on Configuration -> System at the top of the page. Then open the SlipStream Basics section and define a new instance of the connector with the following format:
<connector-instance-name>:<connector-name>
Here is an example:
exoscale-ch-gva:cloudstack
You can also instantiate the connector several times (in compliance with your license) by comma separating the connector string. Here is an example:
my-cs-1:cloudstack, my-cs-2:cloudstack, ...
Here is a screenshot of the parameter to define:

SlipStream Configuation - Basics section
Don’t forget to save the configuration!
Now that the connector is loaded, you need to configure it.
Configure the connector instance
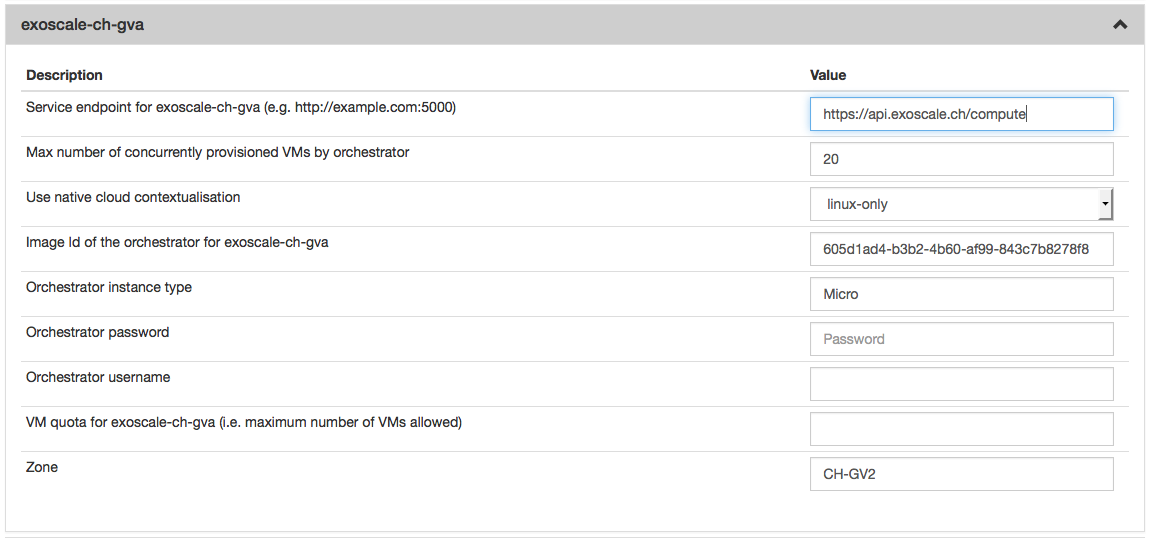
With the connector loaded in SlipStream, a new section in the configuration page will appear, allowing you to configure how the connector is to communicate with the IaaS cloud endpoint.

SlipStream Configuation - CloudStack section
You can find a detailed description of each parameter as well as an
explaination of how to find the right value of them in the
`Parameters <#parameters>`__ paragraph below.
With a Configuration File
Please see Configuration Files for details about this method of configuration.
Here is an example, which will configure the CloudStack connector to interact with Exoscale:
> cat /etc/slipstream/connectors/exoscale-ch-gva.conf
cloud.connector.class = exoscale-ch-gva:cloudstack
exoscale-ch-gva.endpoint = https://api.exoscale.ch/compute
exoscale-ch-gva.zone = CH-GV2
exoscale-ch-gva.quota.vm = 20
exoscale-ch-gva.orchestrator.imageid = 605d1ad4-b3b2-4b60-af99-843c7b8278f8
exoscale-ch-gva.orchestrator.instance.type = Micro
exoscale-ch-gva.orchestrator.ssh.password =
exoscale-ch-gva.orchestrator.ssh.username =
exoscale-ch-gva.native-contextualization = linux-only
exoscale-ch-gva.max.iaas.workers = 20
You can find a detailed description of each parameter as well as an
explaination of how to find the right value of them in the
`Parameters <#parameters>`__ paragraph below.
Parameters
Note: All the CloudStack API examples come from `cloudmonkey <https://cwiki.apache.org/confluence/display/CLOUDSTACK/CloudStack+cloudmonkey+CLI>`__ configured with `Exoscale Open Cloud API <https://community.exoscale.ch/api/compute/>`__ endpoint.
Zone
The availability zone where the virtual machines will be provisionned.
Use the name value from the
listZones
results:
> list zones
count = 1
zone:
name = ch-gva-2
id = 1128bd56-b4d9-4ac6-a7b9-c715b187ce11
[...]
Image Id of the Orchestrator
The image id of the Orchestrator needs to match a Linux image with
wget and python installed. An Ubuntu 12.04 will do the job
perfectly.
Use the id value from the
listTemplates
results:
> list templates templatefilter=featured
count = 37
template:
id = 8c7e60ae-3a30-4031-a3e6-29832d85d7cb
name = Linux Ubuntu 12.04 LTS 64-bit
[...]
For Exoscale you can browse the available templates and choose the one that suits your need.
Flavor of the Orchestrator
The flavor (instance type) is a name which is linked to a hardware specification defined by the Cloud. The Orchestrator doesn’t need a large amount of resources so you can choose a small flavor (like 1 CPU and 512 MB of RAM).
Use the name value from the
listServiceOfferings
results:
> list serviceofferings
count = 7
serviceoffering:
name = Micro
id = 71004023-bb72-4a97-b1e9-bc66dfce9470
[...]
Quota
The quota is a SlipStream feature which enable the SlipStream administrator to set a default quota for all users of a specified connector. You can also override this value per user in the user profile. If this feature is disabled in the SlipStream Advanced section of this page, you can leave this field blank.
Service endpoint
The CloudStack API Endpoint used by SlipStream to communicate with the CloudStack Cloud.
Example: https://api.exoscale.ch/compute
Configure Native Images for This Connector Instance
Now you need to update SlipStream native images to add the image id and some parameters for CloudStack.
This can be done via the UI or via configuration file. Documentation about how to do it via configuration file can be found here Unique Cloud Identifier Configuration Files.
Please go on a SlipStream base image (e.g. Ubuntu 12.04) and click on the Edit button. Add the image id for CloudStack in the section named Cloud Image Identifiers and Image Hierarchy.
And then configure the default amount of CPU and RAM on the tab CloudStack (or the name you gave your CloudStack connector earlier) of the section Cloud Configuration.
User Credentials
Now that the connector is configured and the native images updated, inform your users that they need to configure their credentials for CloudStack in their user profile to take advantage of your new connector.