OpenStack
Installation
You can install the OpenStack connector with:
$ yum install slipstream-connector-openstack
You will need to restart the SlipStream server to make this connector visible.
Configuration
To allow users to take advantage of this connector, you must add one or more instances of this connector by either:
- Using the UI.
- Drop a configuration file and restart the service.
With the UI
Instanciate one or more instances of the connector
Once logged-in with a privileged user (e.g. super), open the configuration page by clicking on Configuration -> System at the top of the page. Then open the SlipStream Basics section and define a new instance of the connector with the following format:
<connector-instance-name>:<connector-name>
Here is an example:
ultimum-cz1:openstack
You can also instantiate the connector several times (in compliance with your license) by comma separating the connector string. Here is an example:
my-os-1:openstack, my-os-2:openstack, ...
Here is a screenshot of the parameter to define:
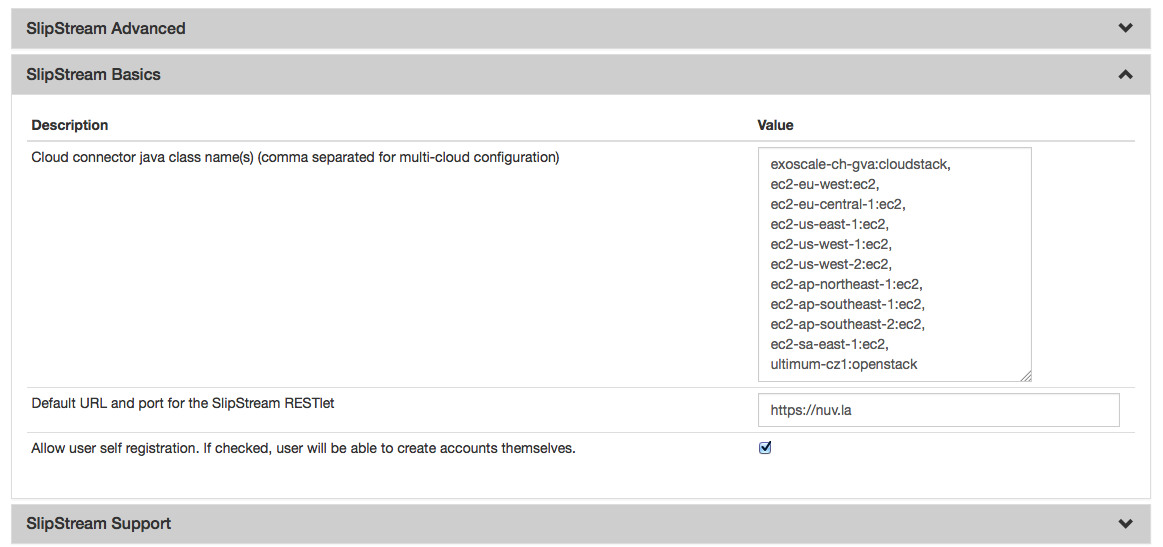
SlipStream Configuation - Basics section
Don’t forget to save the configuration!
Now that the connector is loaded, you need to configure it.
Configure the connector instance
With the connector loaded in SlipStream, a new section in the configuration page will appear, allowing you to configure how the connector is to communicate with the IaaS cloud endpoint.
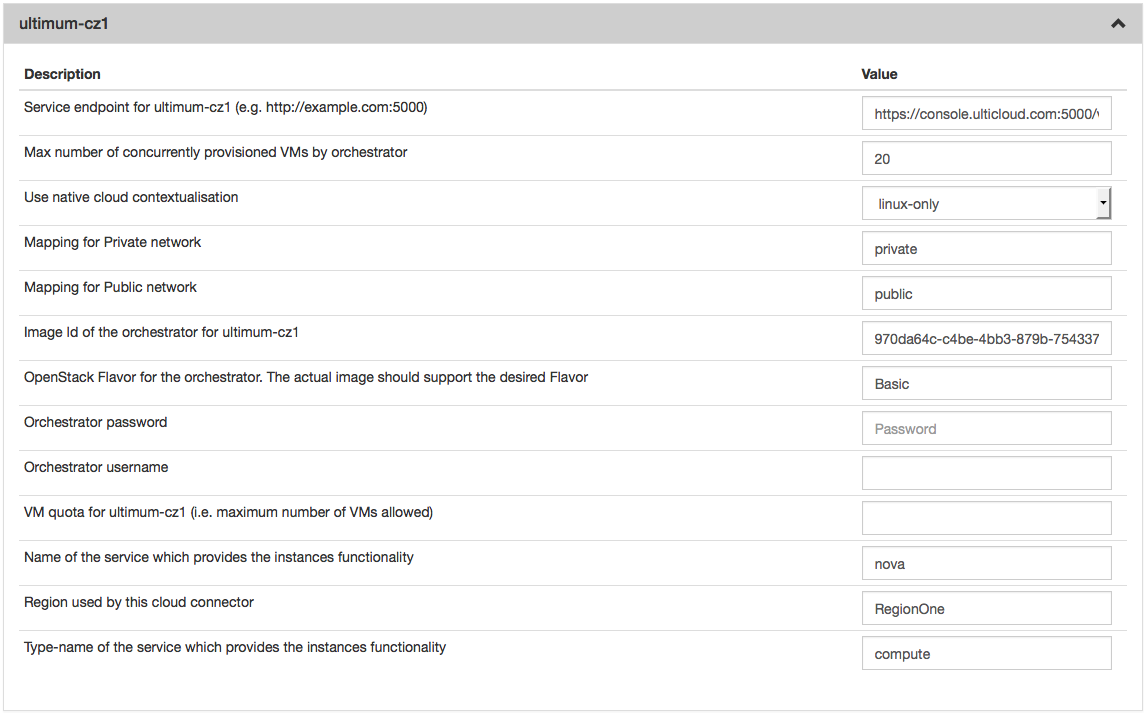
SlipStream Configuation - OpenStack section
You can find a detailed description of each parameter as well as an
explaination of how to find the right value of them in the
`Parameters <#parameters>`__ paragraph below.
With a Configuration File
Please see Configuration Files for details about this method of configuration.
Here is an example, which will configure the OpenStack connector to interact with Ultimum:
$ cat /etc/slipstream/connectors/ultimum-cz1.conf
cloud.connector.class = ultimum-cz1:openstack
ultimum-cz1.quota.vm =
ultimum-cz1.max.iaas.workers = 20
ultimum-cz1.service.name = nova
ultimum-cz1.native-contextualization = linux-only
ultimum-cz1.service.region = RegionOne
ultimum-cz1.network.private = private
ultimum-cz1.orchestrator.instance.type = Basic
ultimum-cz1.service.type = compute
ultimum-cz1.orchestrator.ssh.username =
ultimum-cz1.orchestrator.imageid = 970da64c-c4be-4bb3-879b-75433751e71f
ultimum-cz1.network.public = public
ultimum-cz1.endpoint = https://console.ulticloud.com:5000/v2.0/tokens
ultimum-cz1.orchestrator.ssh.password =
You can find a detailed description of each parameter as well as an
explaination of how to find the right value of them in the
`Parameters <#parameters>`__ paragraph below.
Parameters
Type name of the service which provides the instances functionality
This field should always be compute. If it doesn’t work with this
value, please ask your OpenStack provider/administrator for the correct
value.
Service endpoint
The service endpoint is the URL SlipStream will use to communicate with
the OpenStack. This url needs to match the OpenStack identity service
(Keystone). You can find it in the OpenStack dashboard under Access &
Security in the tab API Access. Most of the time this value will
match the following pattern: https://OpenStack_ip:5000/v2.0
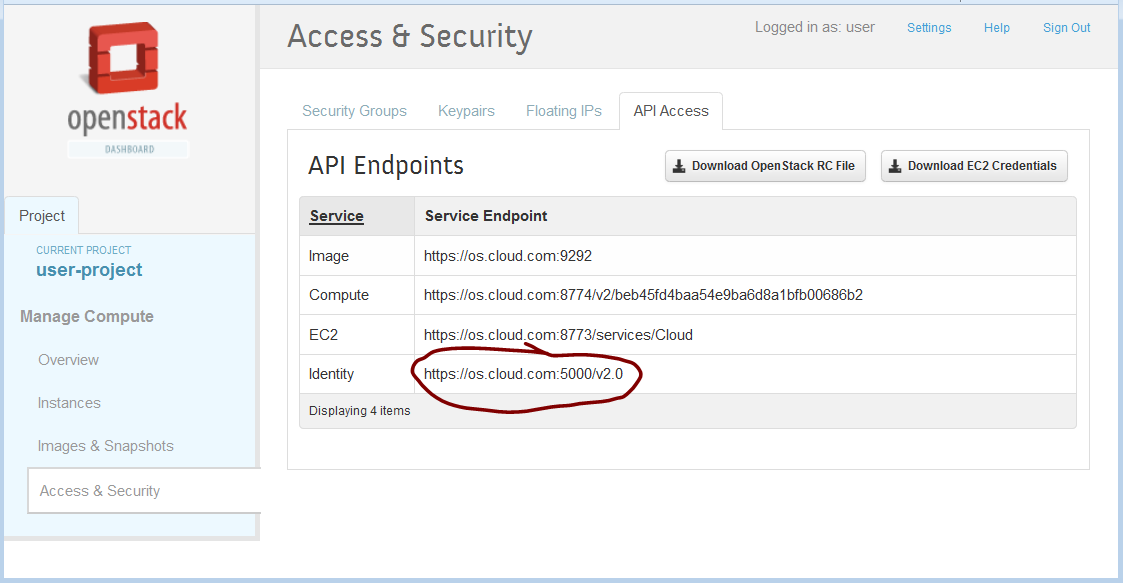
Openstack web interface - Access & Security - API Access
Quota
The quota is SlipStream feature which enable the SlipStream administrator to set a default quota for all users of a specified connector. You can also override this value per user in the user profile. If this feature is disabled in the SlipStream Advanced section of this page, you can leave this field blank.
Image Id of the Orchestrator
The image id of the Orchestrator needs to match a Linux image with
wget and python installed. An Ubuntu 12.04 or 14.04 will do the
job perfectly.
To find an image id go on the OpenStack web interface and click on the link named Images & Snapshots and then click on the image you want. The ID value is what you need to paste in.
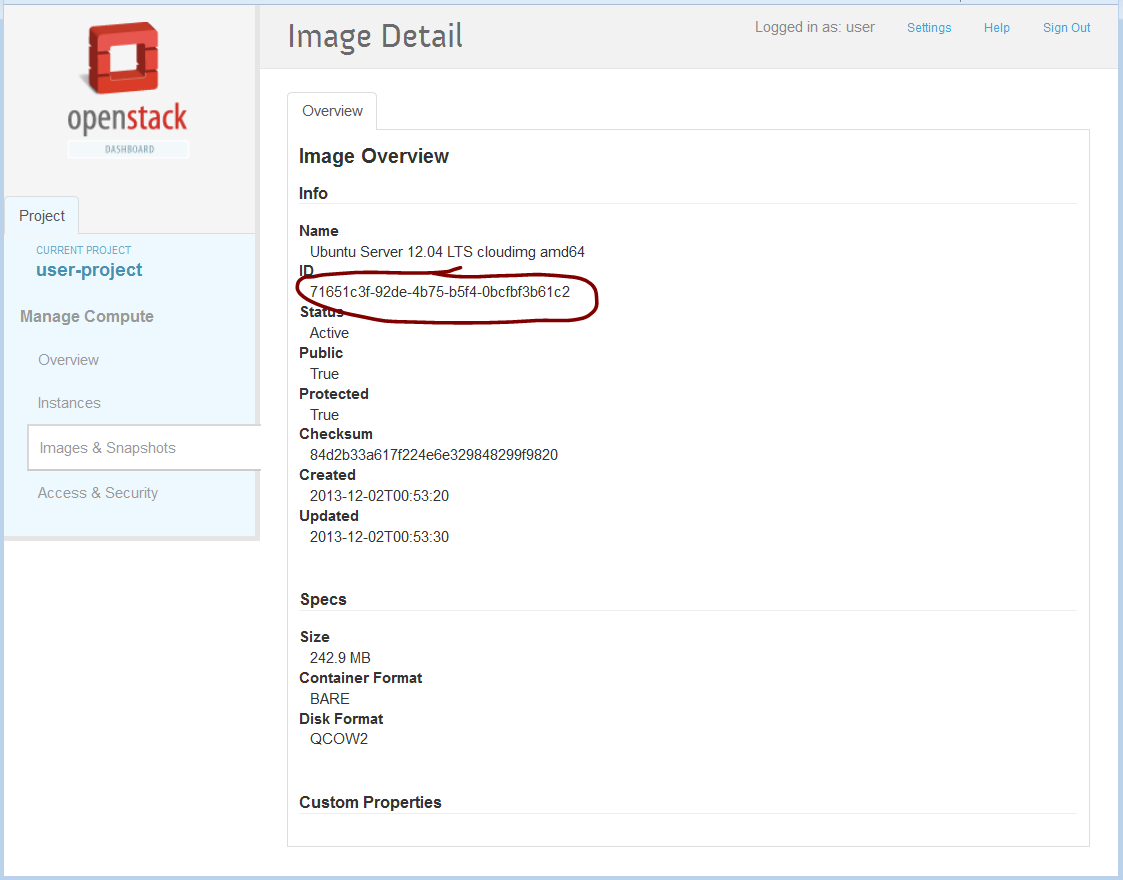
Openstack web interface - Image details
Region
Check this value in the OpenStack documentation or ask your OpenStack
administrator. The default region is RegionOne or regionOne
depending of the OpenStack version.
Name of the service which provides the instances functionality
Most of time the value of this field will be nova and sometime
compute. If it doesn’t work with these values, please ask your
OpenStack administrator for the correct value.
Flavor of the Orchestrator
The flavor (instance type) is a name which is linked to a hardware specification defined by the Cloud. To find the list of all possible values, please go on the OpenStack web interface and find a link called Flavor or Instance type. The Orchestrator doesn’t need a big amount of resources so you can choose a small flavor (like 1 CPU and 512 MB of RAM).
Configure Native Images for This Connector Instance
Now you need to update SlipStream native images to add the image id and some parameters for OpenStack.
This can be done via the UI or via configuration file. Documentation about how to do it via configuration file can be found here Unique Cloud Identifier Configuration Files.
Please go on a SlipStream base image (e.g. Ubuntu 14.04) and click on the Edit button. Add the image id for OpenStack in the section named Cloud Image Identifiers and Image Hierarchy.
And then configure the default instance type and the default security groups on the tab OpenStack (or the name you gave your OpenStack connector earlier) of the section Cloud Configuration.

SlipStream Image - edit mode OpenStack
User Credentials
Now that the connector is configured and the native images updated, inform your users that they need to configure their credentials for OpenStack in their user profile to take advantage of your new connector.