Authentication
By default, SlipStream will be configured to authenticate users against its internal database using usernames and passwords for credentials.
SlipStream can also be configured to authenticate users against generated API keys and secrets as well as against external identity providers that use either the OpenID Connect (OIDC) or GitHub OAuth protocols. Doing so requires:
- Registration of the SlipStream server with the external identity provider,
- Creating an appropriate “Session Template” resource within SlipStream, and
- Configuring the server with the parameters of the identity provider.
You may configure SlipStream to use any number of compatible external identity providers.
Internal
When the ssclj server starts, it will create a Session Template
resource (session-template/internal) that allows users to
authenticate with SlipStream via usernames and passwords within its
own database.
Warning
Although the administrator can delete the
session-template/internal resource, this is not
recommended. Deleting this resource will prevent everyone from
logging in via their usernames and passwords until the server is
restarted.
The values in this template are used by browser and command line clients to guide users during the login process. You may want to customize the “name” or “description” values to better suit your SlipStream deployment.
Assuming that you’ve configured ss-curl (cURL) and that
you’ve logged into the server as an administrator using ss-curl
(cURL), you can then download the existing template
with the command:
ss-curl https://<slipstream_host>/api/session-template/internal
substituting your SlipStream host name. You can then modify the JSON document and upload the modified version like so:
ss-curl -XPUT -H content-type:application/json \
        -d@internal-modified.json \
        https://<slipstream_host>/api/session-template/internal
Your modifications will be persisted in the database and will survive
restarts of the ssclj service. You should generally not add or
remove keys, as this will likely result in a document that does not
conform to the defined schema.
API Key and Secret
Users can generate API keys and secrets to allow for timed or revocable access to the SlipStream server, either via the browser or the API.
To allow users to authenticate with an API key and secret, you must create a Session Template that authorizes this. No other configuration is required.
Upload Session Template
Each available authentication method is associated with a “Session Template” resource. You must create one that will use the API keys and secrets generated by users. A JSON representation of the Session Template resource looks like the following:
{
   "method": "api-key",
   "instance": "api-key",

   "name" : "Login with API Key and Secret",
   "description" : "Authentication with API Key and Secret",
   "group" : "Login with API Key and Secret",

   "key" : "key",
   "secret" : "secret",

   "acl": {
             "owner": {"principal": "ADMIN",
                       "type":      "ROLE"},
             "rules": [{"principal": "ADMIN",
                        "type":      "ROLE",
                        "right":     "ALL"},
                       {"principal": "ANON",
                        "type":      "ROLE",
                        "right":     "VIEW"},
                       {"principal": "USER",
                        "type":      "ROLE",
                        "right":     "VIEW"}]
          }
}
For API key and secret access, the value for the “method” key must be “api-key”. You may set “instance” to any identifier that you would like, although “api-key” is a good choice.
The values for the “name”, “description”, and “group” keys are used by the clients to present useful information to the users.
The ACL must allow the “ANON” role to view the template; if you do not allow this, then unauthenticated users will not be able to view and to use this Session Template for logging into the server.
Assuming that you’ve configured ss-curl (cURL) that
you’ve logged into the server as an administrator using ss-curl
(cURL), you can then create a new resource from
your file like so:
ss-curl -XPOST \
        -H content-type:application/json \
        -d@api-key.json \
        https://<slipstream_host>/api/session-template
If this responds with a “201 Created” response, then the resource was properly created.
If the resource already exists, you’ll get a “409 conflict” response. If you want to modify an existing resource, simply use PUT the entire modified resource to the resource URL:
https://<slipstream_host>/api/session-template/<instance>
where the last part corresponds to the “instance” of the resource.
To delete, the session template, just use DELETE on the same URL.
GitHub
GitHub uses a variant of the OAuth protocol to allow external services to use GitHub as an identity provider. To configure SlipStream to use GitHub as an identity provider you must:
- Register an OAuth application within your GitHub organization,
- Add an appropriate Session Template resource to your SlipStream server, and
- Add the associated Configuration resource to your SlipStream server.
The following sections provide detailed instructions for each of these steps.
Register OAuth Application
On GitHub, navigate to the “settings” page for your account or organization. On the left of the page, you will see a link to “OAuth Apps” in the “Developer settings” section. Click on this link.
In the upper-right corner of the page, you will find a “Register a new application” button. Click on this button. You will then see a form similar to the following screenshot.
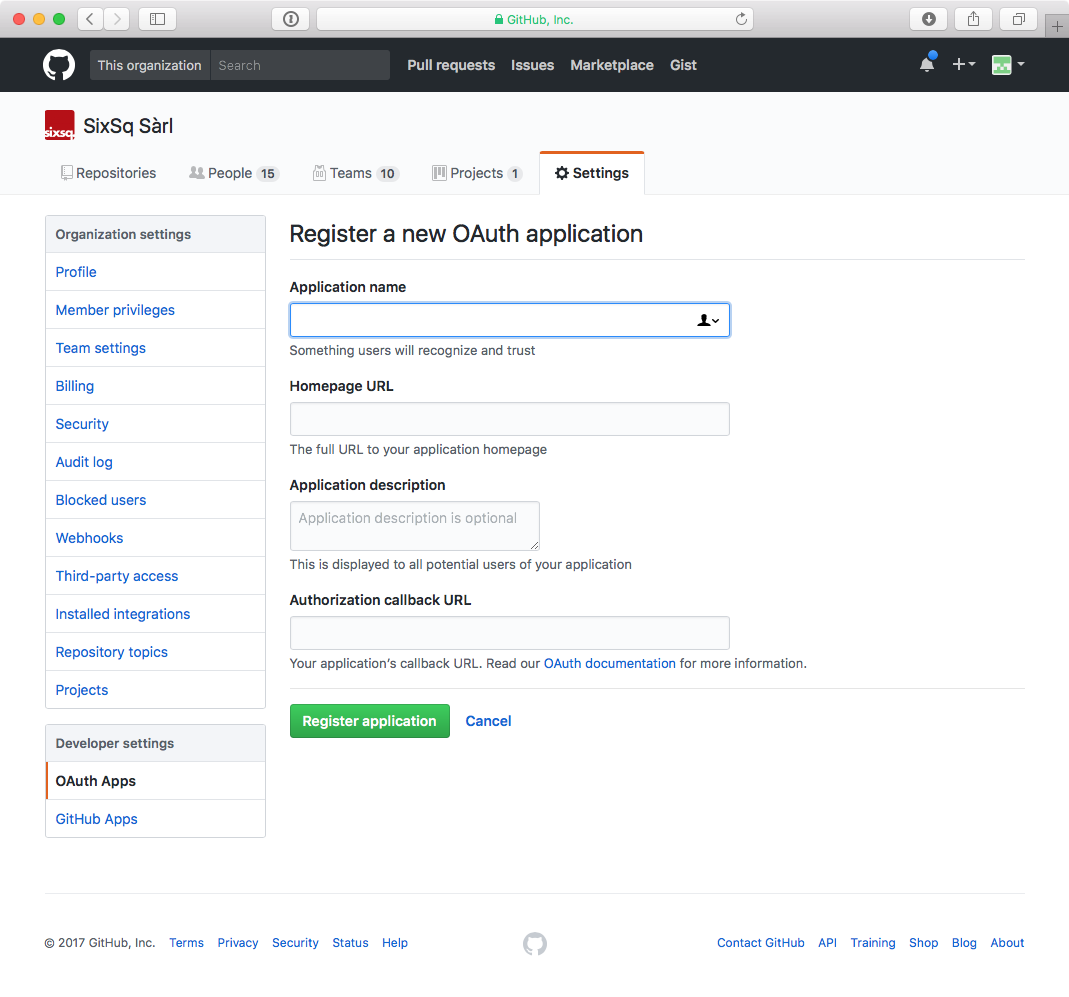
GitHub OAuth Application Registration Form
You must provide an appropriate “Application name”. This will be presented to the users who try to log in via SlipStream and should be something that users will recognize and associate with your SlipStream instance. You must also provide a “Homepage URL”, which will normally point to your SlipStream installation. You may provide a more detailed “Application description” if you want.
The most important field is the “Authorization callback URL”. This must contain the right value for the full GitHub authentication workflow to complete correctly. This field prevents other servers from spoofing your SlipStream installation. The value should be:
https://<slipstream_host>/api/session/
where you replace “<slipstream_host>” with the hostname of your SlipStream server.
Once you have provided all of this information, you can click on the “Register application” button. This will then take you to the application page that will show you the “Client ID” and “Client Secret”. These two values are required for the SlipStream server configuration. From this page, you can also supply a service logo that will be presented to the user during the authentication process.
Upload Session Template
Each available authentication method is associated with a “Session Template” resource. You must create one that will use the GitHub OAuth App that you have defined. A JSON representation of the Session Template resource looks like the following:
{
   "method": "github",
   "instance": "github-test",
   "name": "Sign In with GitHub (Test)",
   "description": "GitHub Authentication Using the Test Application Definition",
   "acl": {
             "owner": {"principal": "ADMIN",
                       "type":      "ROLE"},
             "rules": [{"principal": "ADMIN",
                        "type":      "ROLE",
                        "right":     "ALL"},
                       {"principal": "ANON",
                        "type":      "ROLE",
                        "right":     "VIEW"},
                       {"principal": "USER",
                        "type":      "ROLE",
                        "right":     "VIEW"}]
          }
}
For GitHub OAuth Apps, the value for the “method” key must be “github”. You may set “instance” to any identifier that you would like; this identifier is used in the server configuration described below.
The values for the “name” and “description” keys are used by the clients to present useful information to the users.
The ACL must allow the “ANON” role to view the template; if you do not allow this, then unauthenticated users will not be able to view and to use this Session Template for logging into the server.
Assuming that you’ve configured ss-curl (cURL) that
you’ve logged into the server as an administrator using ss-curl
(cURL), you can then create a new resource from
your file like so:
ss-curl -XPOST \
        -H content-type:application/json \
        -d@github.json \
        https://<slipstream_host>/api/session-template
If this responds with a “201 Created” response, then the resource was properly created.
If the resource already exists, you’ll get a “409 conflict” response. If you want to modify an existing resource, simply use PUT the entire modified resource to the resource URL:
https://<slipstream_host>/api/session-template/<instance>
where the last part corresponds to the “instance” of the resource.
To delete, the session template, just use DELETE on the same URL.
Configure SlipStream
You must provide the configuration parameters for the GitHub OAuth
application to the ssclj server. This is done by adding a
Configuration resource to the server.
{
    "configurationTemplate": {
        "href": "configuration-template/session-github",
        "instance": "github-test",
        "clientID": "<your client id>",
        "clientSecret": "<your client secret>"
    }
}
Note that the value of the href attribute must be exactly as above
and the value of the instance must be the same as in your Session
Template resource.
The “Client ID” and “Client Secret” are the values that you obtained from your application registration in GitHub.
Like the other resources, this can be added to the server via a POST request.
ss-curl -XPOST \
        -H content-type:application/json \
        -d@configuration-github.json \
        https://<slipstream_host>/api/configuration
This will create the resource. Use a PUT or DELETE on the created resource to modify or delete it, respectively.
OpenID Connect (OIDC)
OpenID Connect (OIDC) is an identity layer built over the OAuth 2.0 protocol. Many services support the OIDC protocol (or variants of it) and can potentially be used as identity providers for SlipStream, for example, Google and LinkedIn.
SlipStream has been tested with the Keycloak service, which acts as a federated identity provider and which can be used to access many other services even if they are not directly supported by SlipStream.
The deployment and configuration of a Keycloak server is not described here. Please see the Keycloak website for that information. You take a look at SixSq’s Keycloak configuration for the Nuvla service.
Upload Session Template
Each available authentication method is associated with a “Session Template” resource. You must create one that will use the OIDC protocol with Keycloak (or another compatible OIDC identity provider). A JSON representation of the Session Template resource looks like the following:
{
   "method": "oidc",
   "instance": "keycloak",
   "name": "Sign In with eduGAIN or Elixir AAI",
   "description": "OIDC Authentication Using Nuvla Keycloak Server for eduGAIN or Elixir AAI",
   "acl": {
             "owner": {"principal": "ADMIN",
                       "type":      "ROLE"},
             "rules": [{"principal": "ADMIN",
                        "type":      "ROLE",
                        "right":     "ALL"},
                       {"principal": "ANON",
                        "type":      "ROLE",
                        "right":     "VIEW"},
                       {"principal": "USER",
                        "type":      "ROLE",
                        "right":     "VIEW"}]
          }
}
For OIDC-based services, the value for the “method” key must be “oidc”. You may set “instance” to any identifier that you would like; this identifier is used in the server configuration described below.
The values for the “name” and “description” keys are used by the clients to present useful information to the users.
The ACL must allow the “ANON” role to view the template; if you do not allow this, then unauthenticated users will not be able to view and to use this Session Template for logging into the server.
Assuming that you’ve configured ss-curl (cURL) and that
you’ve logged into the server as an administrator using ss-curl
(cURL), you can then upload your template like so:
ss-curl -XPOST \
        -H content-type:application/json \
        -d@keycloak.json \
        https://<slipstream_host>/api/session-template
If this responds with a “201 Created” response, then the resource was properly created.
If the resource already exists, you’ll get a “409 conflict” response. If you want to modify an existing resource, simply use PUT the entire modified resource to the resource URL:
https://<slipstream_host>/api/session-template/<instance>
where the last part corresponds to the “instance” of the resource.
To delete, the session template, just use DELETE on the same URL.
Configure SlipStream
You must provide the configuration parameters for the OIDC server to
the ssclj server by adding a Configuration resource.
{
    "configurationTemplate": {
        "href": "configuration-template/session-oidc",
        "instance": "keycloak",
        "clientID": "<your client ID>",
        "baseURL": "<your base URL>",
        "publicKey": "<your RSA public key>",
    }
}
Note that the value of the href attribute must be exactly as above
and the value of the instance must be the same as in your Session
Template resource.
The “Client ID”, “baseURL”, and “publicKey” can be obtained from the administrator of the OIDC service which you are using.
Like the other resources, this can be added to the server via a POST request.
ss-curl -XPOST \
        -H content-type:application/json \
        -d@configuration-keycloak.json \
        https://<slipstream_host>/api/configuration
This will create the resource. Use a PUT or DELETE on the created resource to modify or delete it, respectively.
Link Authentications to a User Account
A user may login to her account using multiple different authentication methods. For example, the user may have both a username/password pair and be able to authenticate via GitHub. Currently, the administrator must configure the server to link multiple authentication methods to a single account.
Warning
Although each authentication method will link to the same SlipStream account, the rights given to the user may be different depending on the authentication method. This is particularly true when using external identity federations that pass attributes to SlipStream.
Via the Browser Interface
In order to know which authentication(s) (aka user identifiers) are currently linked to a given user: visit the page user-identifier link on the CIMI resources page, and add a filter such as:
user/href="user/my-user"
Use the Columns button to include the identifier attribute in
the displayed table.
- An identifier is composed of :
- A domain instance name prefix, followed by
- A
:separator, and - The actual external login name.
Examples include:
github:agithublogin
sixsq:john.smith@unitedid.orghttps://idp.unitedid.org/idp/shibboleth!https://fed-id.nuv.la/samlbridge/module.php/saml/sp/metadata.php/sixsq-saml-bridge!aaa-bbb-ccc
The prefix comes from that last part of the id field of the
associated session-template resource.
To link a new authentication to a user via the Add button
(available after an initial Search on user-identifier listing
page), replace the values <MY_USER>, <INSTANCE> and
<EXTERNAL_LOGIN> in the JSON document that will be submitted,
using the pattern below:
{
"user" : {"href" : "user/<MY_USER>"},
"identifier" : "<INSTANCE>:<EXTERNAL_LOGIN>"
}
Once the document has been created, the user will be able to login to SlipStream with the associated method and identifier.
Note
Attempting to assign the same identifier to more than one Nuvla user will return a 409 (conflict) status and will not create the document.
Via the ss-curl Command
A new user identifier can be added to the server via a POST request.
ss-curl -XPOST \
        -H content-type:application/json \
        -d@user-identifier.json \
        https://<slipstream_host>/api/user-identifier
where the user-identifier.json content follows the same pattern as
above:
{
"user" : {"href" : "user/<MY_USER>"},
"identifier" : "<INSTANCE>:<EXTERNAL_LOGIN>"
}
Like when using the web interface, you can not assign the same identifier value (<INSTANCE>:<EXTERNAL_LOGIN>) to more than one Nuvla user.