Autoscalable Applications
Scalable Applications described how it is possible to define and manually manage the scaling of applications with SlipStream. This section presents the mechanisms and the accompanying infrastructure in SlipStream that allows to auto-scale such applications.
Auto-scaling of User Applications
With SlipStream one can automatically scale up and down the number of instances of an application component of a (possibly) complex application. Currently only one component can be scaled at a time. Work to remove this limitation is ongoing. There are two ways to take advantage of auto-scaling with the existing SlipStream implementation:
- Black-box autoscaling The simplest approach is to use the default implementation of the auto-scaling in SlipStream. Currently, it is suitable for the applications where the only one component will scale based on only one metric. If these requirements are met, adding a special autoscaler component to the user’s application, providing configuration file with the application component scalability constraints, and deploying the application as a scalable deployment allows user to benefit from the automated scalability provided “out of the box” by SlipStream.
- Do-it-yourself (DIY) autoscaling The implementation of the autoscaler in SlipStream allows users to supply their own implementations of the autoscaling logic. In this case, SlipStream takes care of the deployment of the autoscaler platform and running the user supplied auto-scaling logic. What is required from the user is the inclusion of the autoscaler in the user’s application as a component and providing a public URL with the autoscaling implementation.
In the above cases, it is required that chosen components of the user’s application publish metrics on which the scaling actions will be based and to support the automatic scaling.
SlipStream uses Riemann to implement its auto-scaling decision making feature and consequently requires that the metrics be published as Riemann events. To facilitate metrics collection, Riemann has a wide range of metric publishers; these include a Riemann plugin for Collectd and a Python CLI and library API.
The implementation of the autoscaler in SlipStream is completely open and flexible. It allows users to write their own decision making logic as Riemann streams and to provide it to the autoscaler component as an input parameter. This can be useful in cases when the default autoscaling implementation, that comes with the SlipStream autoscaler, does not fully satisfy the needs of the user’s application.
Auto-scaling applications with SlipStream
Configuration of Auto-scale Constraints
Below is the example configuration file (in edn format) to be used
with the black-box autoscaling approach. The configuration defines scalability
constraints for an application component called webapp:
[
 {
  ;;
  ;; Mandatory parameters.

  ; name of the component in the application
  :comp-name         "webapp"

  ; service tags as sent by Riemann publisher in the event
  :service-tags      ["webapp"]

  ; monitored service metric name (as sent with Riemann event)
  :service-metric    "avg_response_time"

  ; value of the metric after which start adding component instances
  :metric-thold-up   500.0
  ; value of the metric after which start removing component instances
  :metric-thold-down 200.0

  ; max number of component instances allowed
  :vms-max           4   ; "Price" constraint.

  ;;
  ;; Optional parameters (with defaults).

  ; min number of component instances allowed
  ;:vms-min       1

  ; number of instances by which to scale up
  ;:scale-up-by   1
  ; number of instances by which to scale down
  ;:scale-down-by 1
 }
]
It reads the following way:
- For an application component
webappthe autoscaler expects to receive Riemann events:
- with the service name
avg_response_time,- one of tags being
webapp;- When the value of the metric in the event is
- above
metric-thold-up(500.0), then the autoscaler should perform a scale up action,- below
metric-thold-down(200.0), then the autoscaler should perform a scale down action;- The autoscaler should not perform scale up action if there are already
vms-max(4) component instances running,- The minimum number of component instances should not go below
vms-min. That is, the autoscaler should not attempt a scale down action if the number of the currently running component instances isvms-min(1),- The autoscaler should scale up by
scale-up-bynumber of instances and scale down byscale-down-by.
Autoscaler Component
The autoscaler component is available on Nuvla at apps/SSAutoscaler/ss-autoscaler. Its source code is published on GitHub.
The application uses Riemann to process incoming component metrics as events.
The main part of the application is the Riemann configuration file,
app/riemann-ss-streams.clj, the script is written in Clojure programming
language.
The default implementation loads the auxiliary library (as the
sixsq.slipstream.riemann.scale Clojure namespace) that defines custom event
processing streams and helper functions. It then uses those functions to read
in the scalability constraints for the component(s), to process/update incoming
events (or generate new events), to make the scaling decisions, and to request
the scaling actions from SlipStream.
The decision-making algorithm uses Riemann’s moving time window stream with a window size of 30s to smooth out spikes in the incoming metrics’ time series.
The functions defined in the sixsq.slipstream.riemann.scale namespace
simplify the main configuration script by providing a number of utility
functions that hide the details of interacting with SlipStream to request
scaling actions, creating new and/or updating old events, and (re-)indexing
and/or publishing them to Graphite. The namespace is defined in a the
run-proxy/api module in the GitHub repository. All the public functions are
documented.
Based on the example in app/riemann-ss-streams.clj and taking advantage of
the utility functions, application developers can write their own scaling logic
and then provide it to the autoscaler component as a public URL via an input
parameter. For details, see the apps/SSAutoscaler/ss-autoscaler component on Nuvla.
The deployment script of the autoscaler module deploys Riemann, the Riemann
dashboard, and Graphite. After deployment,
the Riemann dashboard can be found at the URL http://<autoscaler IP>:6006
and Graphite, at http://<autoscaler IP>.
Riemann acts as a stream processing engine with no or little memory of the events. Graphite is used to store the historical data of the events. Primarily this is used to plot the historical data, but could also be read into the Riemann streams to consider the history when making scalability decisions.
Publishing Component Metrics to Autoscaler
The autoscaler makes the scalability decisions based on the metrics coming from the user’s application components and the thresholds provided by the user. Because the autoscaler is a Riemann application, the user must use one of the many Riemann clients to push the metrics (as events) to it. Check Riemann clients for the list of available clients.
Example Auto-scale Application
The following section describes the example auto-scale application that uses write Riemann plugin of collectd and a custom publisher written in Python using Riemann client library API.
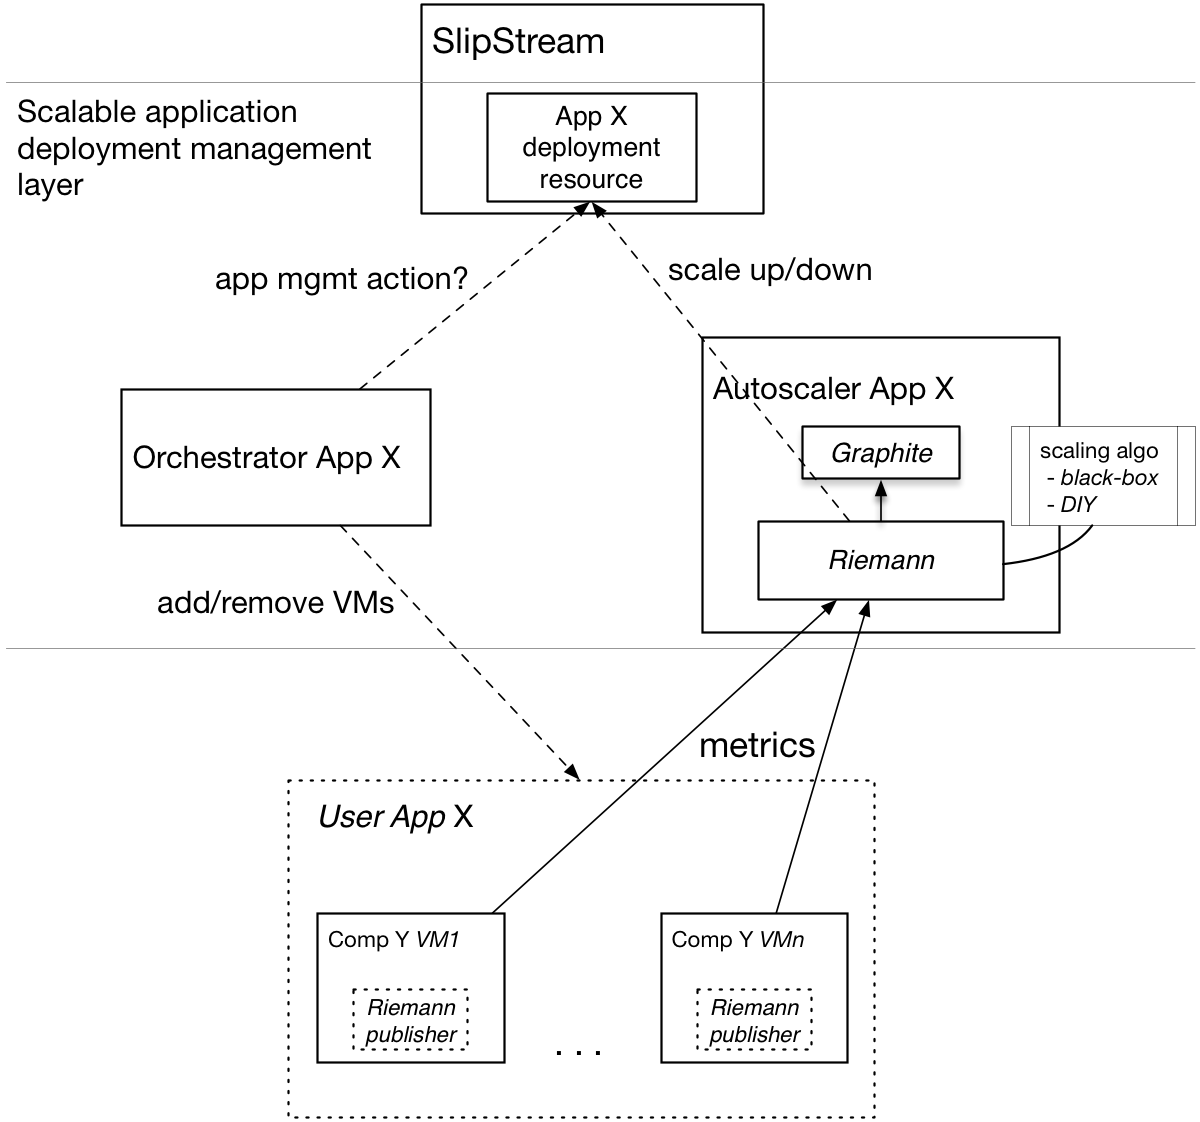
The example auto-scale application is a web application that uses the Riemann
collectd plugin and a custom publisher written in Python and the Riemann
Client API. It consists of the following components:
- webapp: a stateless web application that takes requests, synchronously performs a moderately intensive computation (calculating Pi up to 100 digits), and returns the result,
- nginx: a load balancer based on Nginx that distributes client requests to the set of stateless web servers,
- client: a test client based on Locust that simulates a varying number of clients, and
- autoscaler: Standard SlipStream autoscaler component that makes scaling decisions.
and it is schematically depicted in the figure below.

Components of Example Auto-scale Application
Application Configuration and Deployment
The figure below shows the definition of the autoscalable application in SlipStream.
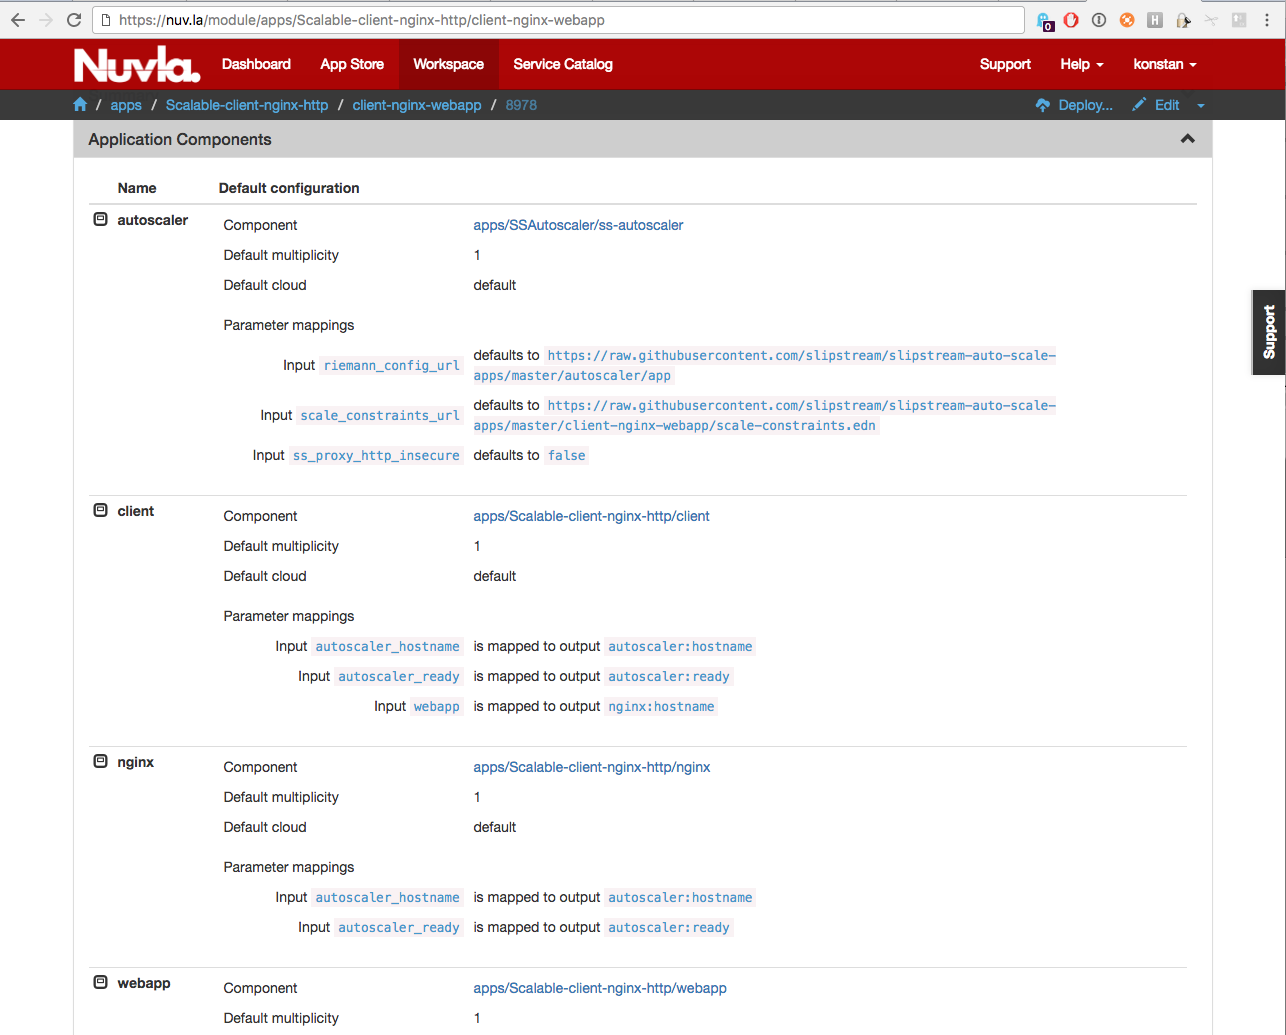
Example Scalable Application Definition in SlipStream
Note that values for the autoscaler input parameters, namely,
riemann_config_url and scale_constraints_url must be provided. The
first one defines the URL with a resource under which the following files are
expected:
- riemann-ss-streams.clj: Riemann streams using SlipStream scale up/down actions,
- dashboard.json: Riemann dashboard layout and queries, and
- dashboard.rb: Riemann dashboard configuration.
They contain the processing logic for autoscaling actions and the configuration
for the Riemann dashboard. This allows users to provide their own
implementation of the scaling logic and dashboard configuration. The second
input parameter scale_constraints_url provides the URL with the application
scaling definitions. For this application, they look like:
$ cat scale-constraints.edn

[
 {:comp-name         "webapp"
  :service-tags      ["webapp"]
  :service-metric    "avg_response_time"
  :metric-thold-up   7000.0
  :metric-thold-down 4000.0
  :vms-max           4}
]
This file is application-specific; for this example, it comes from the user application module on GitHub.
Clicking on Deploy button brings the Application Deployment dialog (see figure below). In this dialog, you must check the box to indicate that this is a scalable application; you can optionally change the multiplicity of the webapp component. Select the cloud and proceed with the deployment.
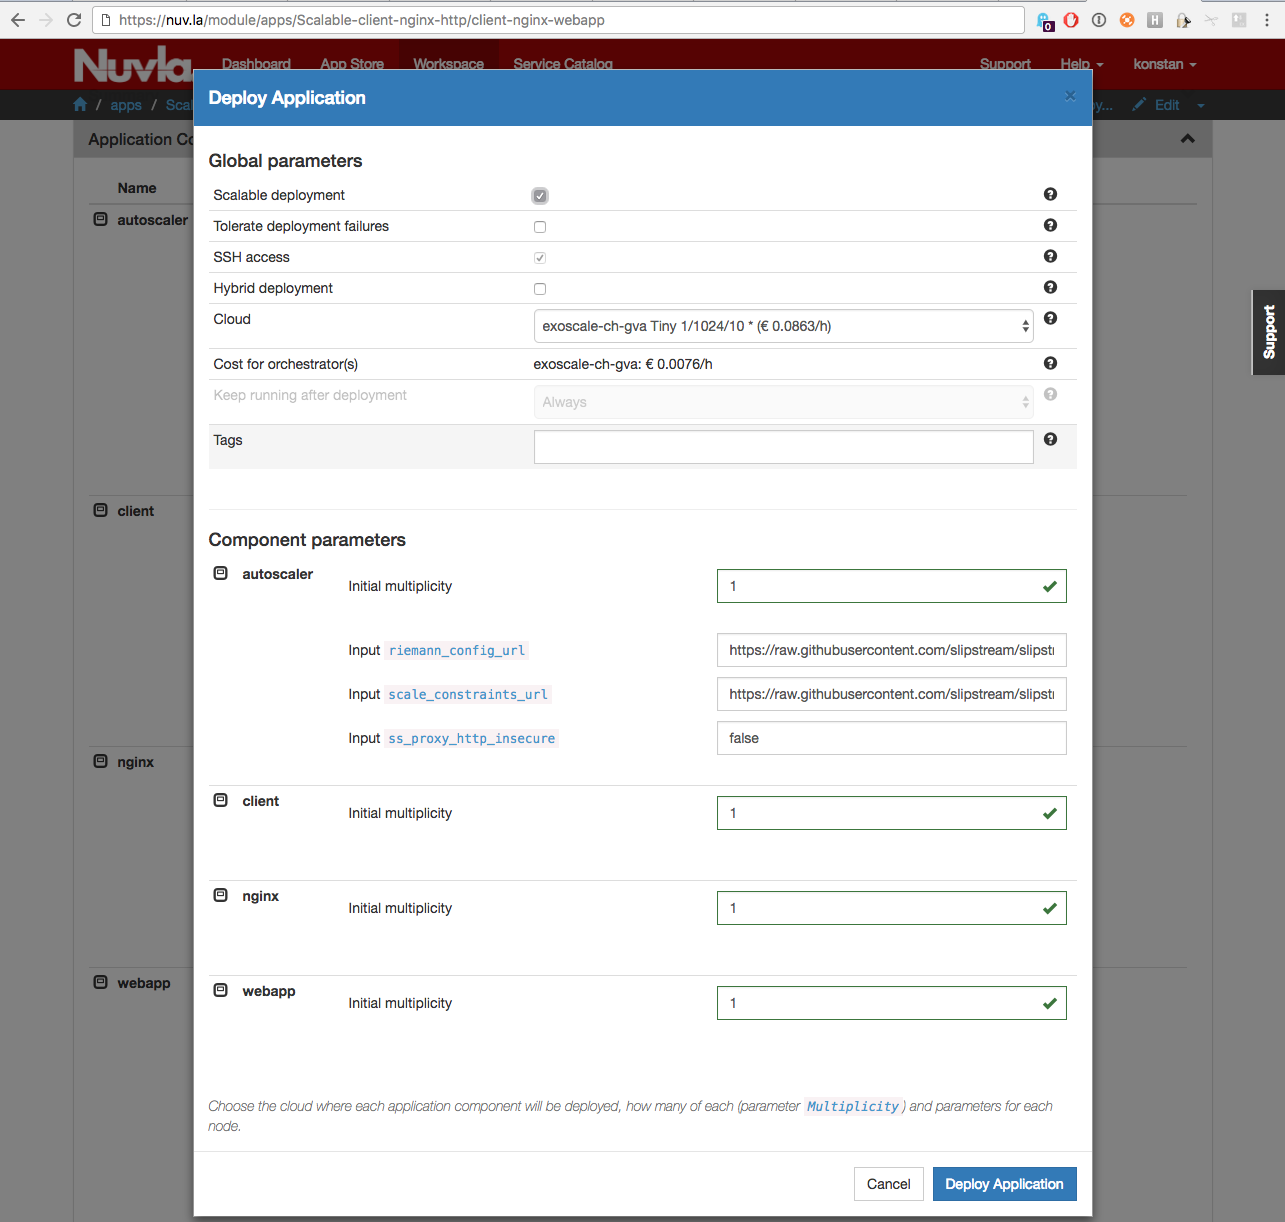
Deployment of Example Scalable Application
Usage of the Application After Deployment
After a successful deployment of the application one should first open the HTTP URL published by the client component (see ellow arrow on the figure below).
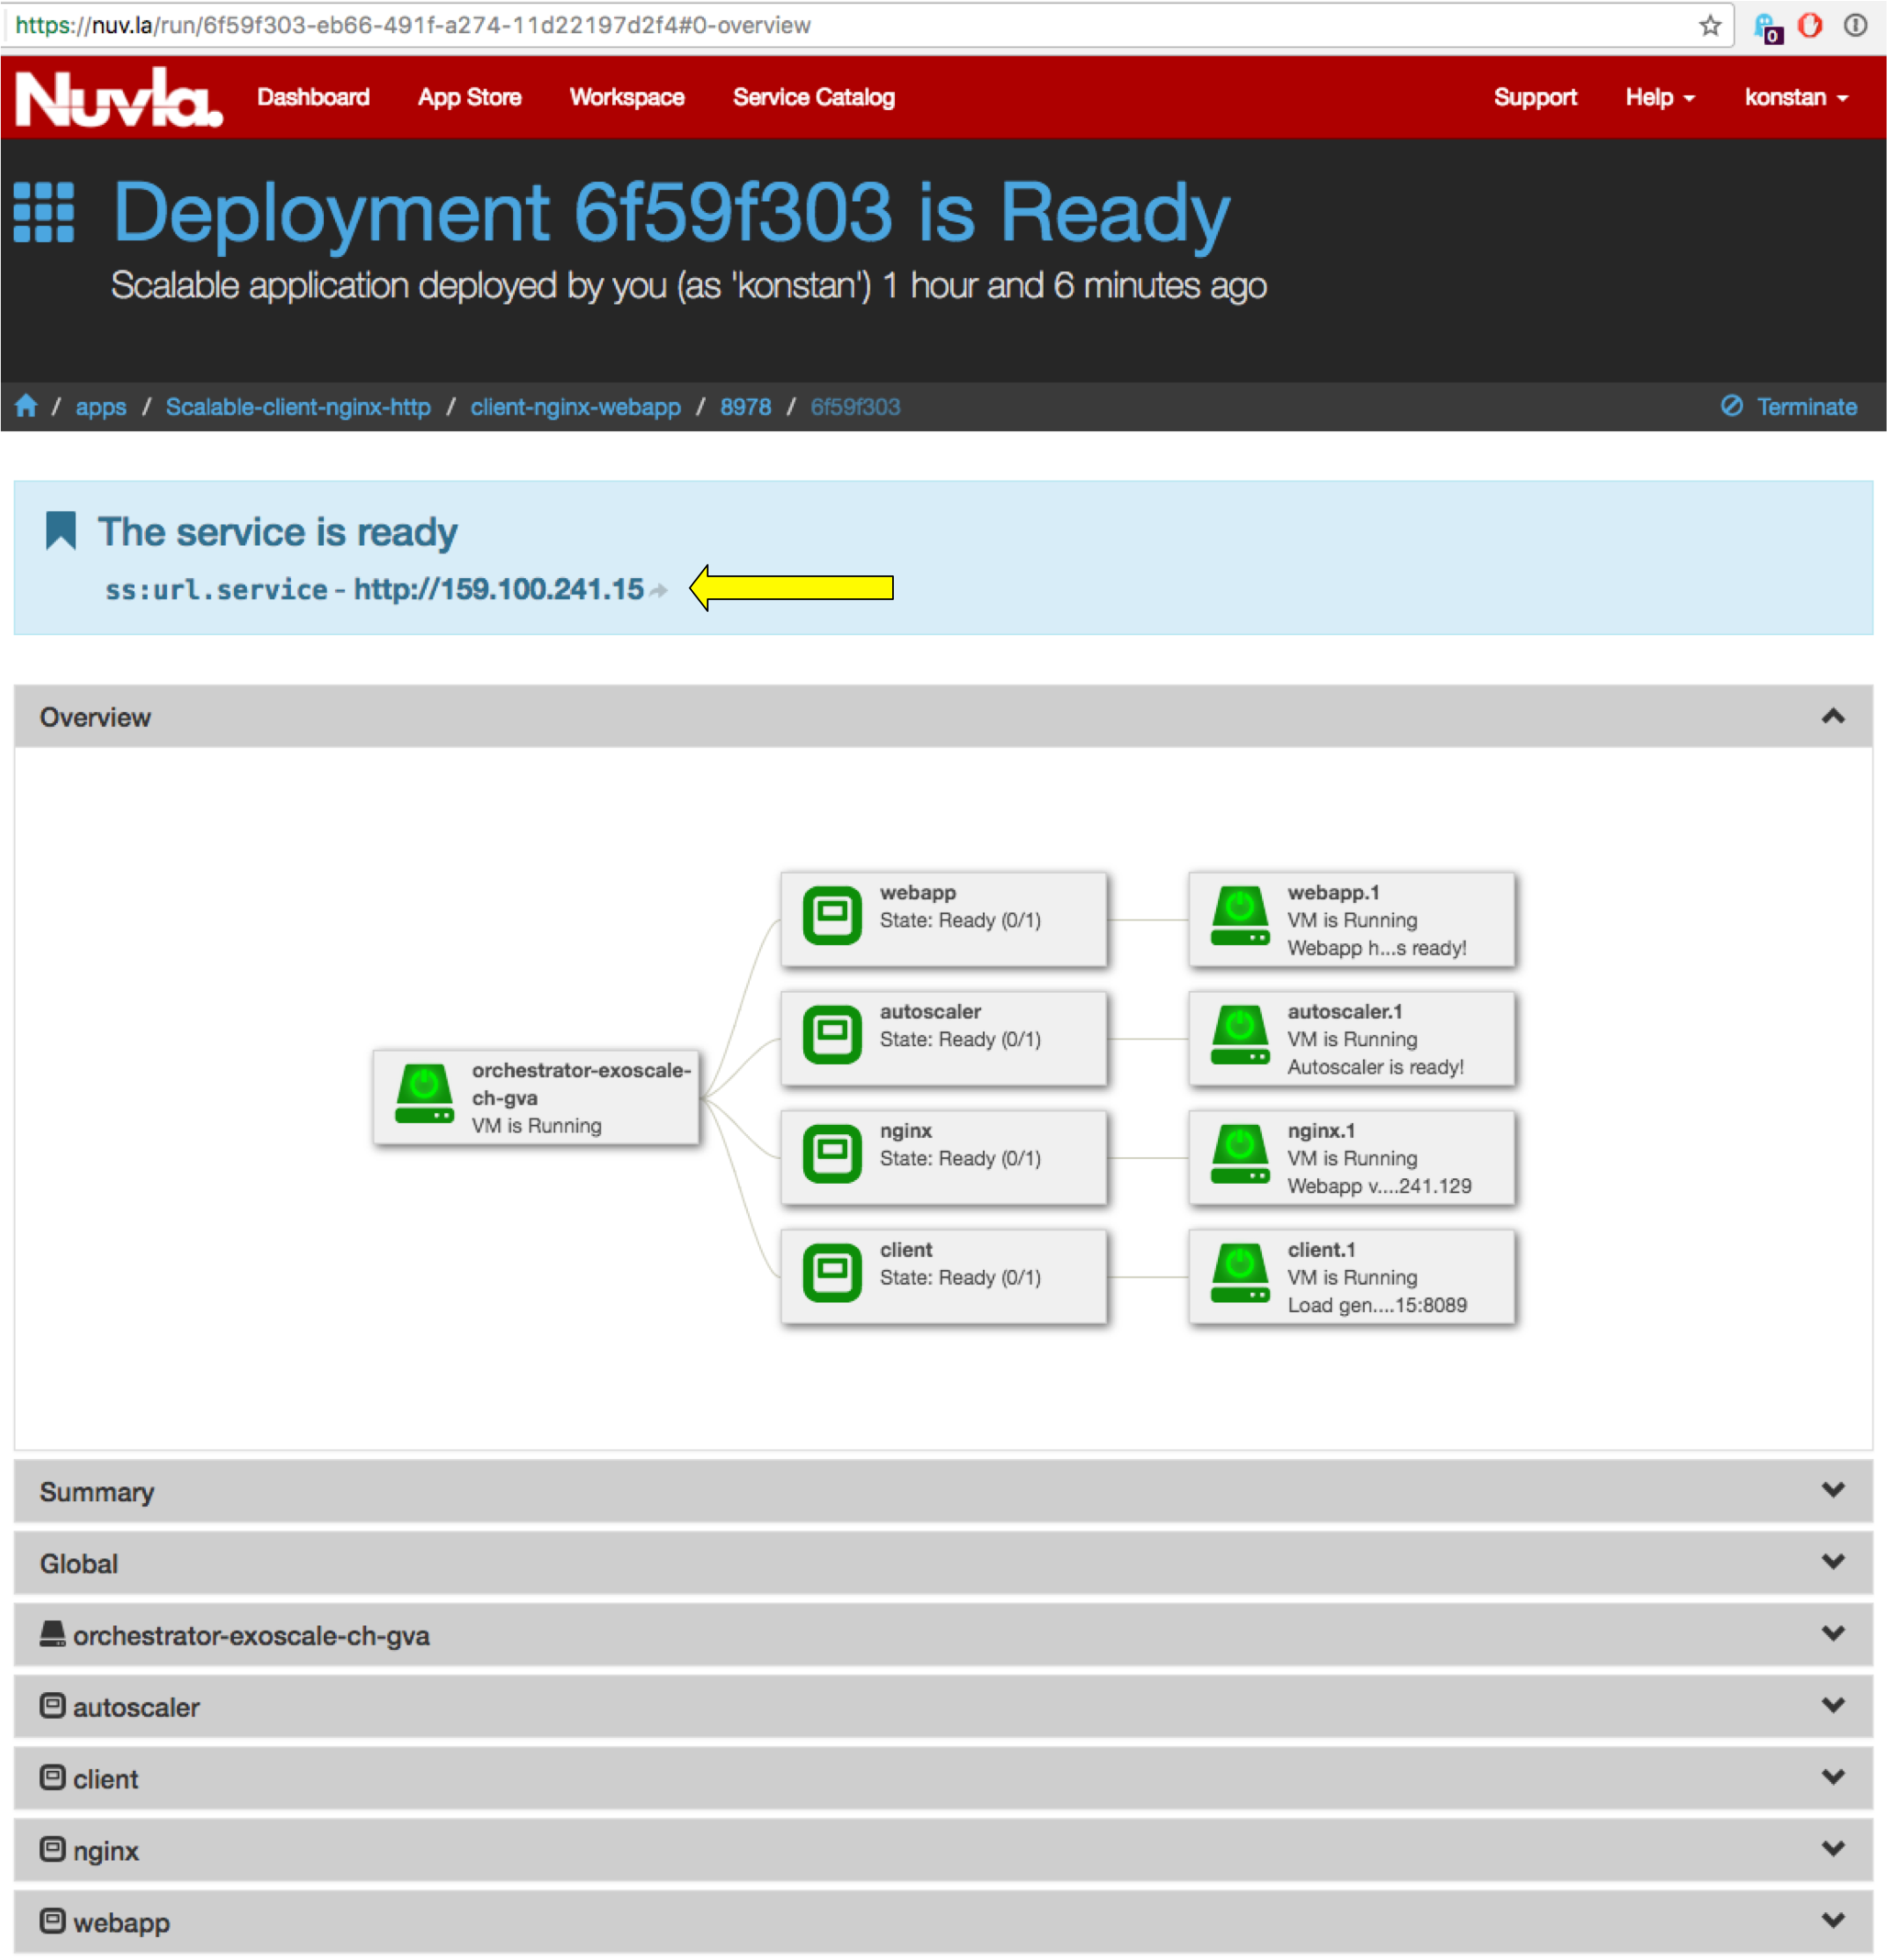
Deployed Autoscalable Application
It provides a page with a description of the application, a deployment diagram, and links to the services running on other components (see figure below).
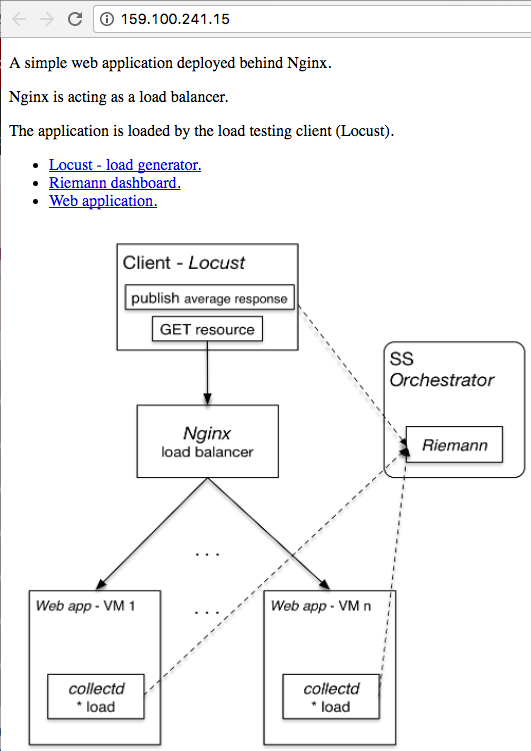
Application Entry Point
The first link to follow is the one pointing to the Locust load generator; this simulates a varying number of clients. Although Locust can be used as an automatic load generator, this application assumes manual configuration of the load parameters. Figure below shows the definition of three parallel users that Locust will use to access the web layer and load it with requests. The endpoint to contact and the resource of the web application were already automatically configured during the component deployment.
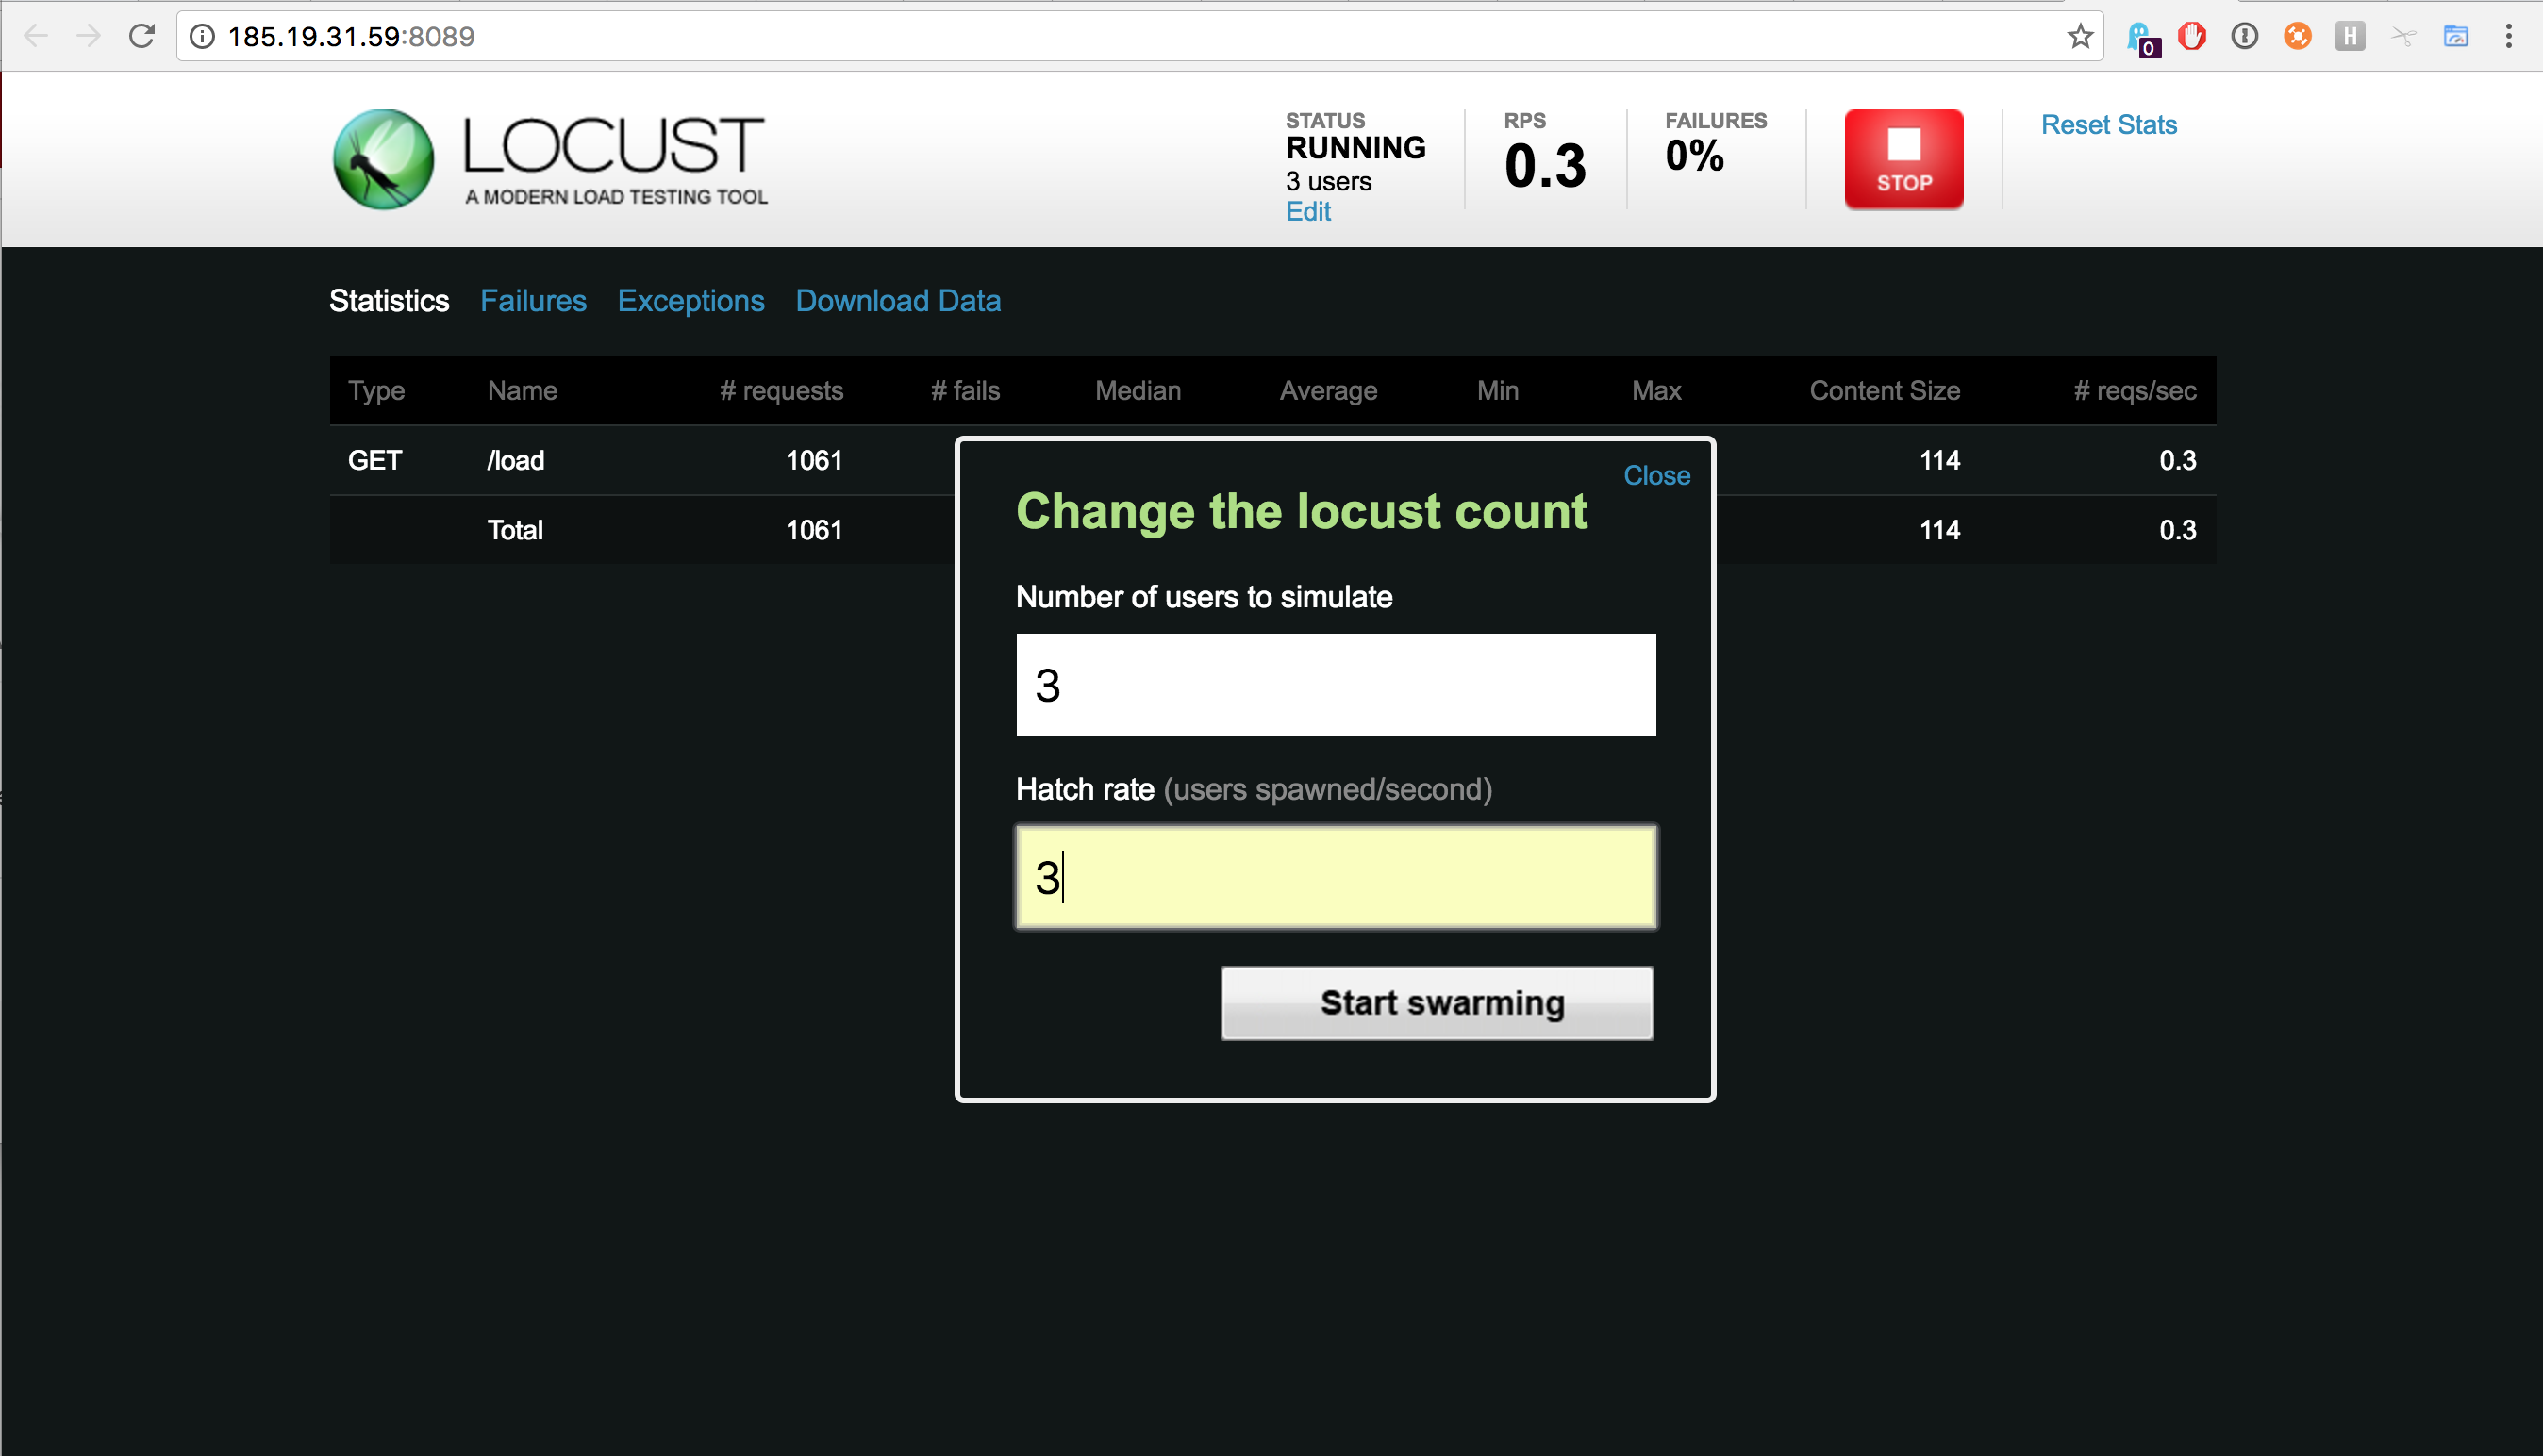
Locust: Defining Work (as 3 Users) to Load the Application
After Locust starts loading the web application, a custom Riemann events publisher collects the average response time metric from Locust and publishes it as an event to the Riemann service running on the autoscaler. The event looks like this:
{"service": "avg_response_time",
  "tags": ["webapp"],
  "ttl": 10,
  "host": "httpclient",
  "time": 1479202972,
  "metric_f": 3167.896}
Other metrics are also collected and sent from client (Locust) and webapp component instances. For example:
- The client publishes number of concurrent clients used by Locust, current requests per second, and the request fail rate;
- The webapp instances publish their current 1, 5, and 15 min load. This
metric is published through the Riemann collectd plugin. This is deployed and
configured automatically on each webapp with the
collectd.shscript available from the repository.
Based on the load metrics reported by the webapp instances, a Riemann stream dynamically calculates the current number of the instances and indexes it to allow the Riemann dashboard to query and display it.
The current multiplicity of the webapp component is queried by a Riemann stream directly from SlipStream and indexed. As one can see in the figure below, there is a delay between the provision request (multiplicity as reported by SlipStream) and availability of the virtual machine (as reported by the load metrics). This is almost entirely due to the provisioning latency on IaaS level; SlipStream’s control flow contributes negligibly to the latency.
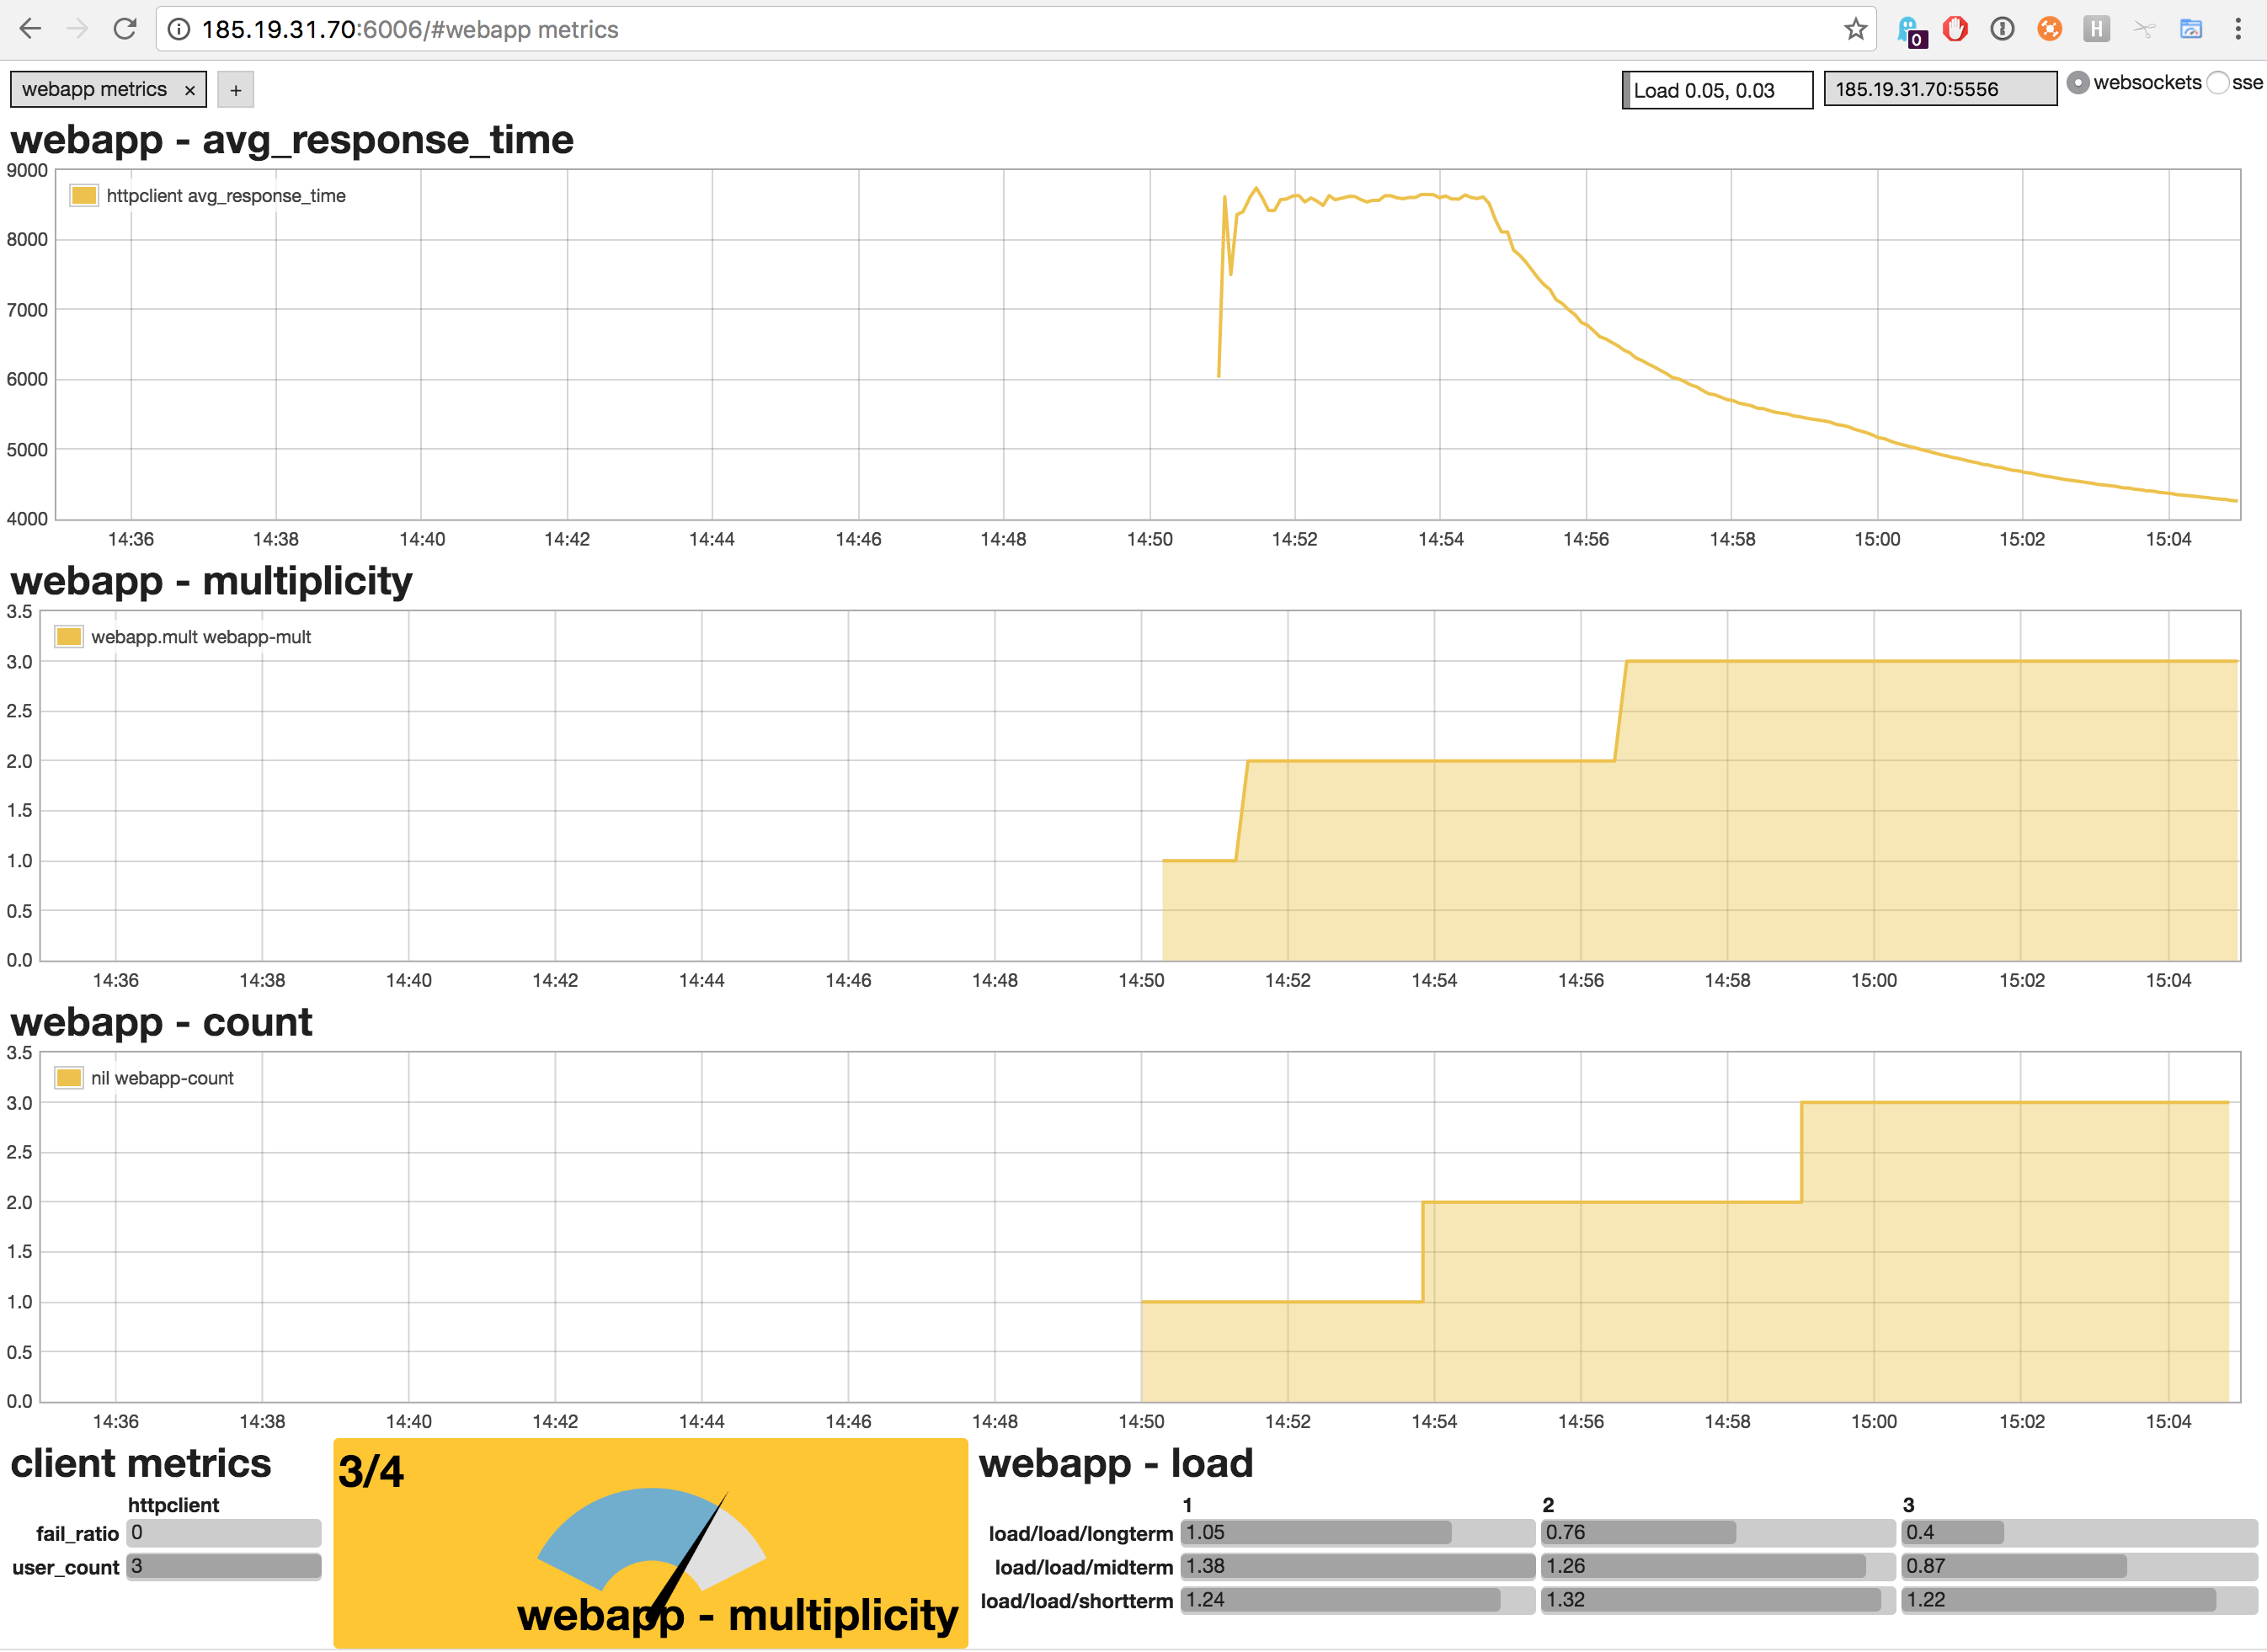
Riemann-dash: High Load on the Web Layer
Based on the given constraints, the autoscaler attempted to satisfy the scalability constraints provided for the webapp component by keeping the average response time metric within the requested bounds.
All the application level metrics (native or generated) are published to Graphite, which is deployed on the autoscaler and runs alongside Riemann. See the figure below, which shows historical evolution of the average response time in Graphite.

Average Response Time as a Function of Time in Graphite