Attaching Sensors & Controllers
To attach a sensor, you have to edit your component in SlipStream and add an Additional custom textual VM template. Anything placed in this field is transmited unmodified to the KVM hypervisor.
First of all, we need to add a USB controller, on which we attach the USB device. To do so, for USB 2.0 or USB 3.0 devices, use the following template to attach your device to your virtual machine at startup.
You should only update the vendor id value and the product id
with values corresponding to your device.
RAW = [ TYPE = "kvm",
        DATA = "
        <devices>
          <controller type='usb' index='1' model='piix3-uhci'/>
          <hostdev mode='subsystem' type='usb' managed='yes'>
            <source>
              <vendor id='0x046d'/>
              <product id='0x0826'/>
            </source>
            <address type='usb' bus='0' port='1'/>
          </hostdev>
        </devices>"]
Hint
In NuvlaBox administrator UI, you can easily get vendor
id and product id of attached devices.
Warning
You have to attach specified devices in Additional custom textual VM template to your NuvlaBox, otherwise deployed concerned Virtual machine can’t boot.
To attach other host devices, please refer to the libvirt documentation.
Deploying Sensor-based Applications
Here on Nuvla you can find different sensor-based applications to be launched from Nuvla on your NuvlaBox.
Other examples
SixSq is participating in SCISSOR, a H2020 project supported by the European Commission. The aim of this project is to design a new generation SCADA security monitoring framework.
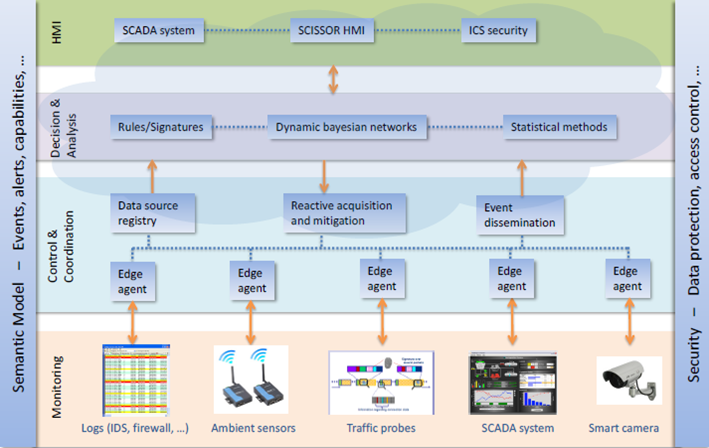
SCISSOR four-layer SCADA security monitoring framework
The “edge agents” in the above figure run on NuvlaBox machines.
Through SixSq’s participation in this project, the following types of devices have been demonstrated with the NuvlaBox:
- IP camera
- USB microphone
- Serial communication to capture information from RFID sensors
- Network activity from IDS analysers
- Logging