Components Part I
A minimal operating system isn’t very useful by itself. We want to transform such a simple image into a component running services that we need for our cloud application.
In this section you’ll learn how to:
- Automate the installation and configuration of services,
- Parameterize the component to allow deploy-time configuration, and
- Pass information from the application back to the user.
In doing this you’ll also understand:
- How to reference images from components,
- The purpose of the various SlipStream “recipes”, and
- When those recipes are executed.
In this chapter, we’ll create a web server component that can be customized when deployed and that protects a “secret” with basic authentication.
Important
The command line examples throughout the tutorial use Linux bash syntax. If you’re using a different shell (csh, PowerShell, etc.), you’ll need to adjust the syntax accordingly.
Similarly, the example applications developed in the tutorial are uniformly built over the Ubuntu operating system. This is to reduce distractions and make the tutorial as uniform as possible. SlipStream supports a wide range of different operating systems, including Windows.
Web Server Component
It wouldn’t be practical to have to log into every deployed virtual machine to install software and to configure it. This process needs to be automated to allow people to concentrate on less tedious tasks and to ensure that the process is consistent and error-free.
Let’s start by creating a new web server component that will automatically install and configure nginx, a standard web server.
Create Component
Navigate to your home project and then click on the menu item to create a “New component”. You should then see a page that looks like the following screenshot.
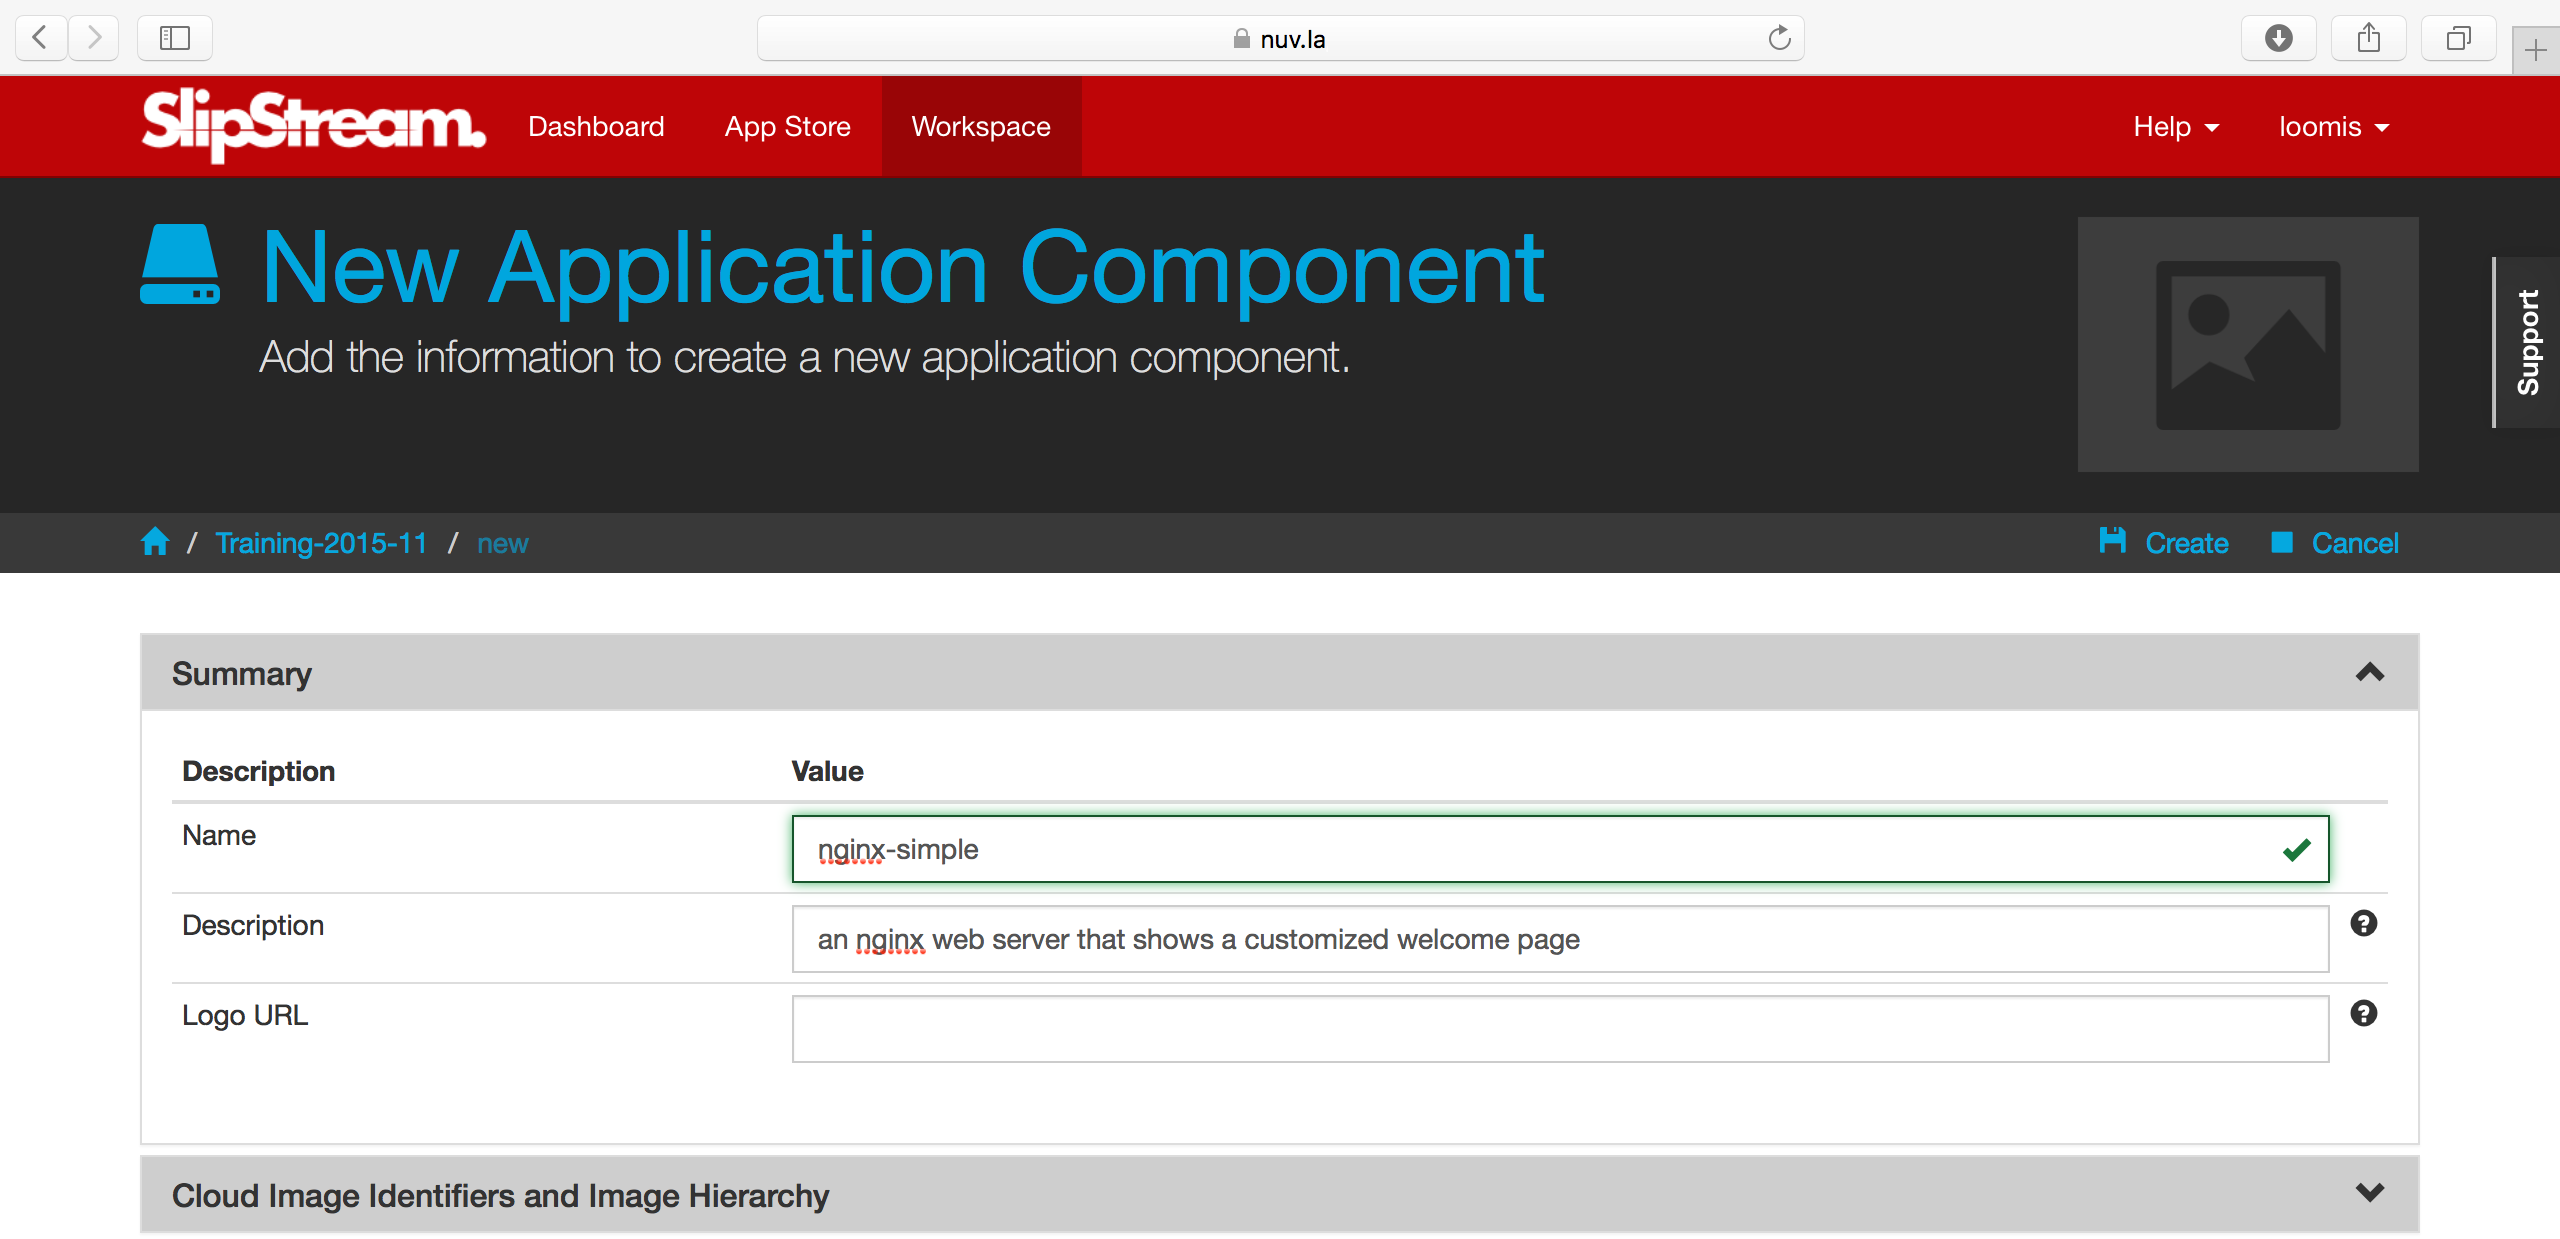
Provide values for the name and description, but don’t save the component yet.
Reference Native Image
Open the “Cloud Image Identifiers and Image Hierarchy” section. At the bottom of this section we want to click on the button that says “Choose reference”. This allows us to choose the native image that we want to use for our component. When you click the button, you will see a “chooser” dialog, like in the following screenshot.
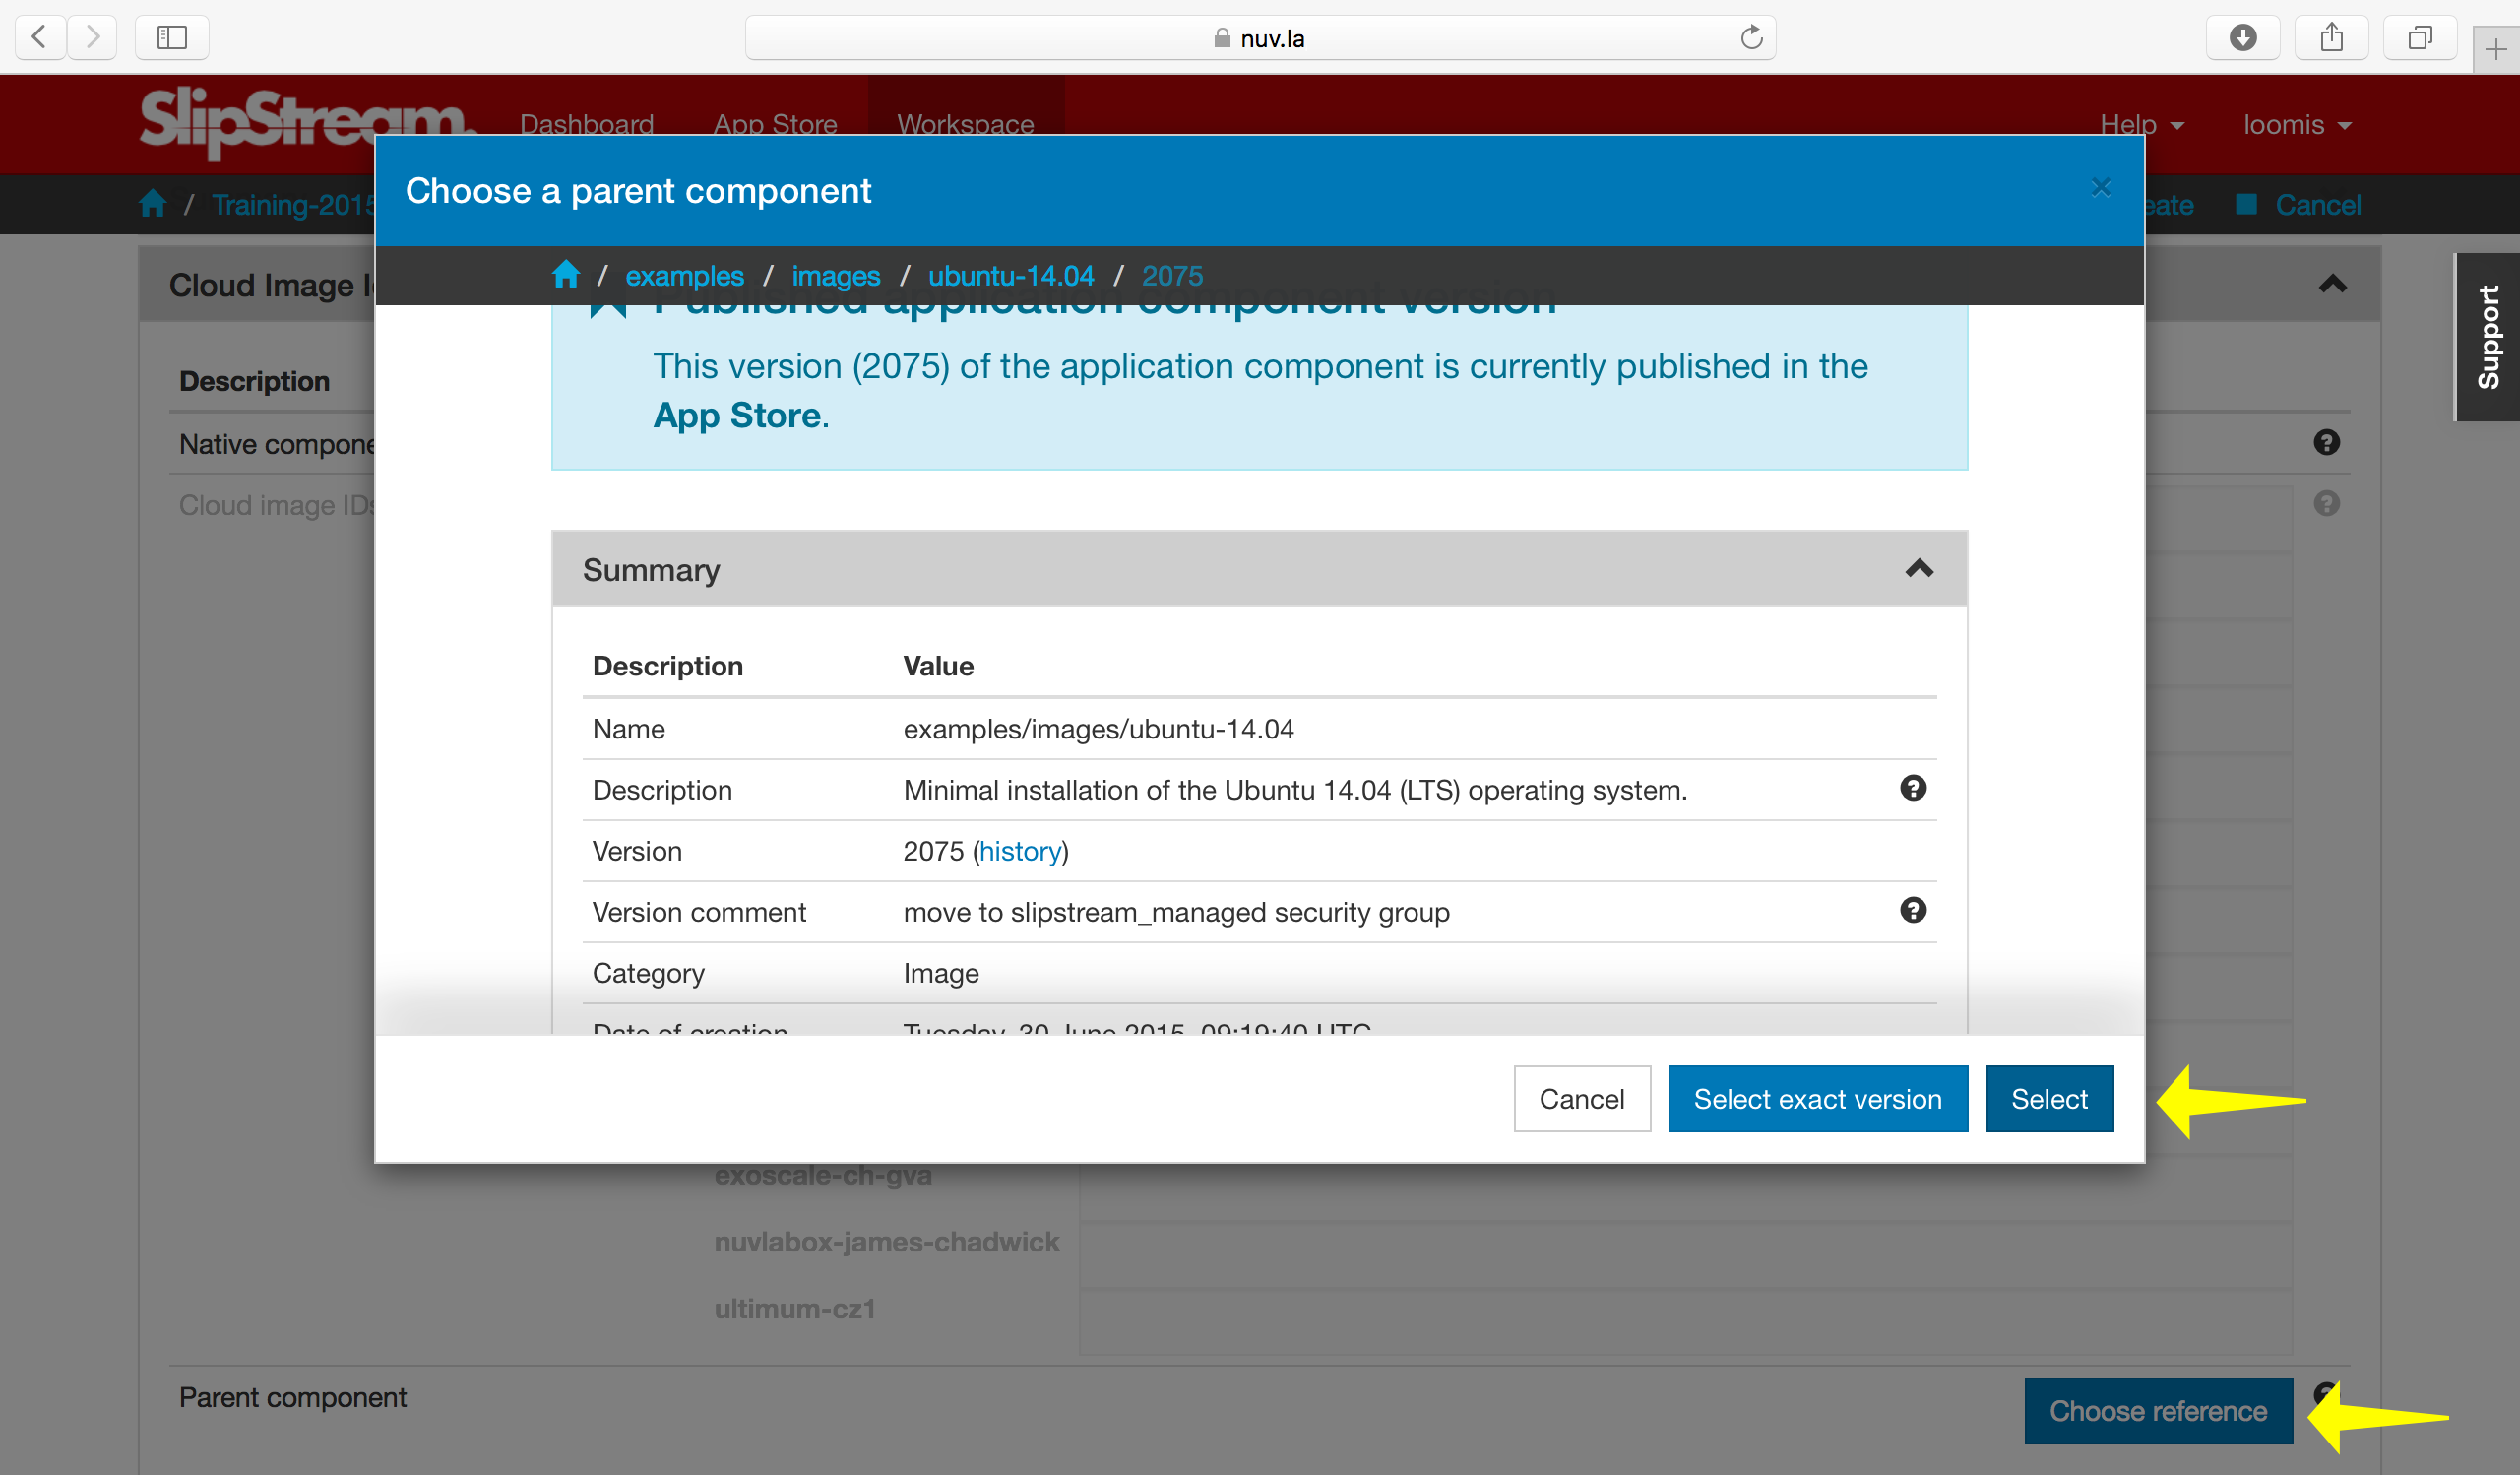
Navigate to the examples/images/ubuntu-14.04 and click on the
“Select” button. This will add the reference to the image
description. Do not click on “Create” yet.
Warning
There are two buttons to choose from in the chooser. What’s the difference?
- Select: Chooses the given image and will use the latest version of the image when the component is deployed.
- Select exact version: Chooses the given image and will always use this exact version when deploying the component.
With the floating version, the component will always take advantage of improvements to the referenced image, with a slight possiblity of running into breaking changes.
Locking the version avoids this problem, but you may run into the case where the referenced image has been removed by the provider.
Generally, you will almost always want to choose “Select”!
Add Nginx
To get our web server installed and running, we need to:
- Install the nginx software
- Configure the nginx server to start automatically, and
- Add our customized web page
To accomplish these tasks we want to add the appropriate “recipes” or “hooks” to the component definition. Open the “Application Workflows” section of the component. Along the left edge you’ll see the set of recipes that you can add. They are essentially run in the order that they are listed.
Important
What type of information do you add to each recipe? Here is the general guide:
- Pre-install
- This is the first recipe to be executed. It will be run before SlipStream installs anything else on the machine (either the SlipStream client or specified packages). This can be used, for instance, to update the package manager configuration on the machine or to upgrade the system.
- Install packages
- This recipe is a list of packages to be installed on the machine. SlipStream will use the appropriate package manager for the operating system, which normally will also install any dependencies. This only supports Debian and RedHat families of operating systems. If you’re using something else (e.g. Windows), install packages manually with the “Post-install” recipe.
- Post-install
- This recipe should be used for any static configuration of the machine. That is configuration that will never need to be changed during the deployment or operation of the machine.
- Deployment
- Dynamic configuration of the machine should be handled in this recipe. This includes configuration based on the component’s parameters and this is where one would use SlipStream CLI/API for orchestrating the deploment between components.
- Reporting
- This will be executed when gathering up the reports from the deployment. In addition to the usual files, you can add additional files to be copied back to the SlipStream server.
- On VM add
- A recipe which is executed when an application containing the component is “scaling up”, that is adding new resources. Ignore this recipe for now, you’ll learn more about it in the application scaling chapter later.
- On VM remove
- A recipe which is executed when an application containing the component is “scaling down”, that is removing existing resources. Ignore this recipe for now, you’ll learn more about it in the application scaling chapter later.
- Pre-Scale
- Runs on the node instance before scale IaaS action (any vertical (subject to implementation by connector) and only horizontal down scaling). Ignore this recipe for now, you’ll learn more about it in the application scaling chapter later.
- Post-Scale
- Runs on the node instance after scale IaaS action (only after vertical scaling (subject to implementation by connector)). Ignore this recipe for now, you’ll learn more about it in the application scaling chapter later.
Using the recipe for installing the nginx server from before, add the following to the “Pre-install” recipe:
#!/bin/bash -xe
apt-get update -y
which will update the configuration of the package manager.
Then add the package “nginx” to the “Install packages” recipe. Nginx is a high-performance web server.
In the “Post-install” recipe, we want to create our customized welcome page, ensure that the nginx server is started, and that nginx always starts when the machine boots. Add the following:
#!/bin/bash -xe

# remove default site and create our own
rm -f /etc/nginx/sites-enabled/default
cat > /etc/nginx/sites-enabled/mysite <<EOF
server {
  listen 80 default_server;

  root /var/www/html;
  index index.html;
}
EOF

# customize the welcome page
mkdir -p /var/www/html
cat > /var/www/html/index.html <<EOF
<html>
  <head>
    <title>Welcome to SlipStream!</title>
  </head>

  <body>
    <h1>Welcome to SlipStream!</h1>
    <p>An nginx server deployed with SlipStream.</p>
  </body>
</html>
EOF

# start web server on boot
update-rc.d nginx enable

# ensure web server is running with changes
service nginx restart
With these definitions you can now click on the “Create” button to create the component definition.
Warning
All of the recipes must be executable by the underlying operating
system. Make sure that you’ve added the shebang line to all of the
recipes #!/bin/bash -xe (or similar)!
Note
Using the “-xe” options on the shebang line helps with debugging when there are problems. The “-x” option will print each line in the script to the stdout before executing it. The “-e” option will stop the script on the first error.
You can then click on the “Deploy…” button to deploy the web server and ensure that it works as expected. When visiting the URL for the machine “http://host_ip/”, you should see something like the following screenshot.

Parameterized Web Server
It wouldn’t be very useful if we had to create a new component definition every time we wanted to change some behavior: like the location of a database, password for a server, descriptive text, etc. We want to parameterize the component to promote reuse. In this case we’ll keep it simple and parameterize the title of the page.
At the same time, we’d like to provide more feedback (through SlipStream) about the state of the application and make it easy to find the deployed web server. We’ll improve this in the next version of the component.
Title Parameter
Let’s begin by defining an input parameter that allows the title to be specified. You can copy your previous component (look under the triangle next to the “Edit” button) or just modify the old one directly. Click “Edit” and then go to the “Application Parameters” section and add an input parameter called “title”.
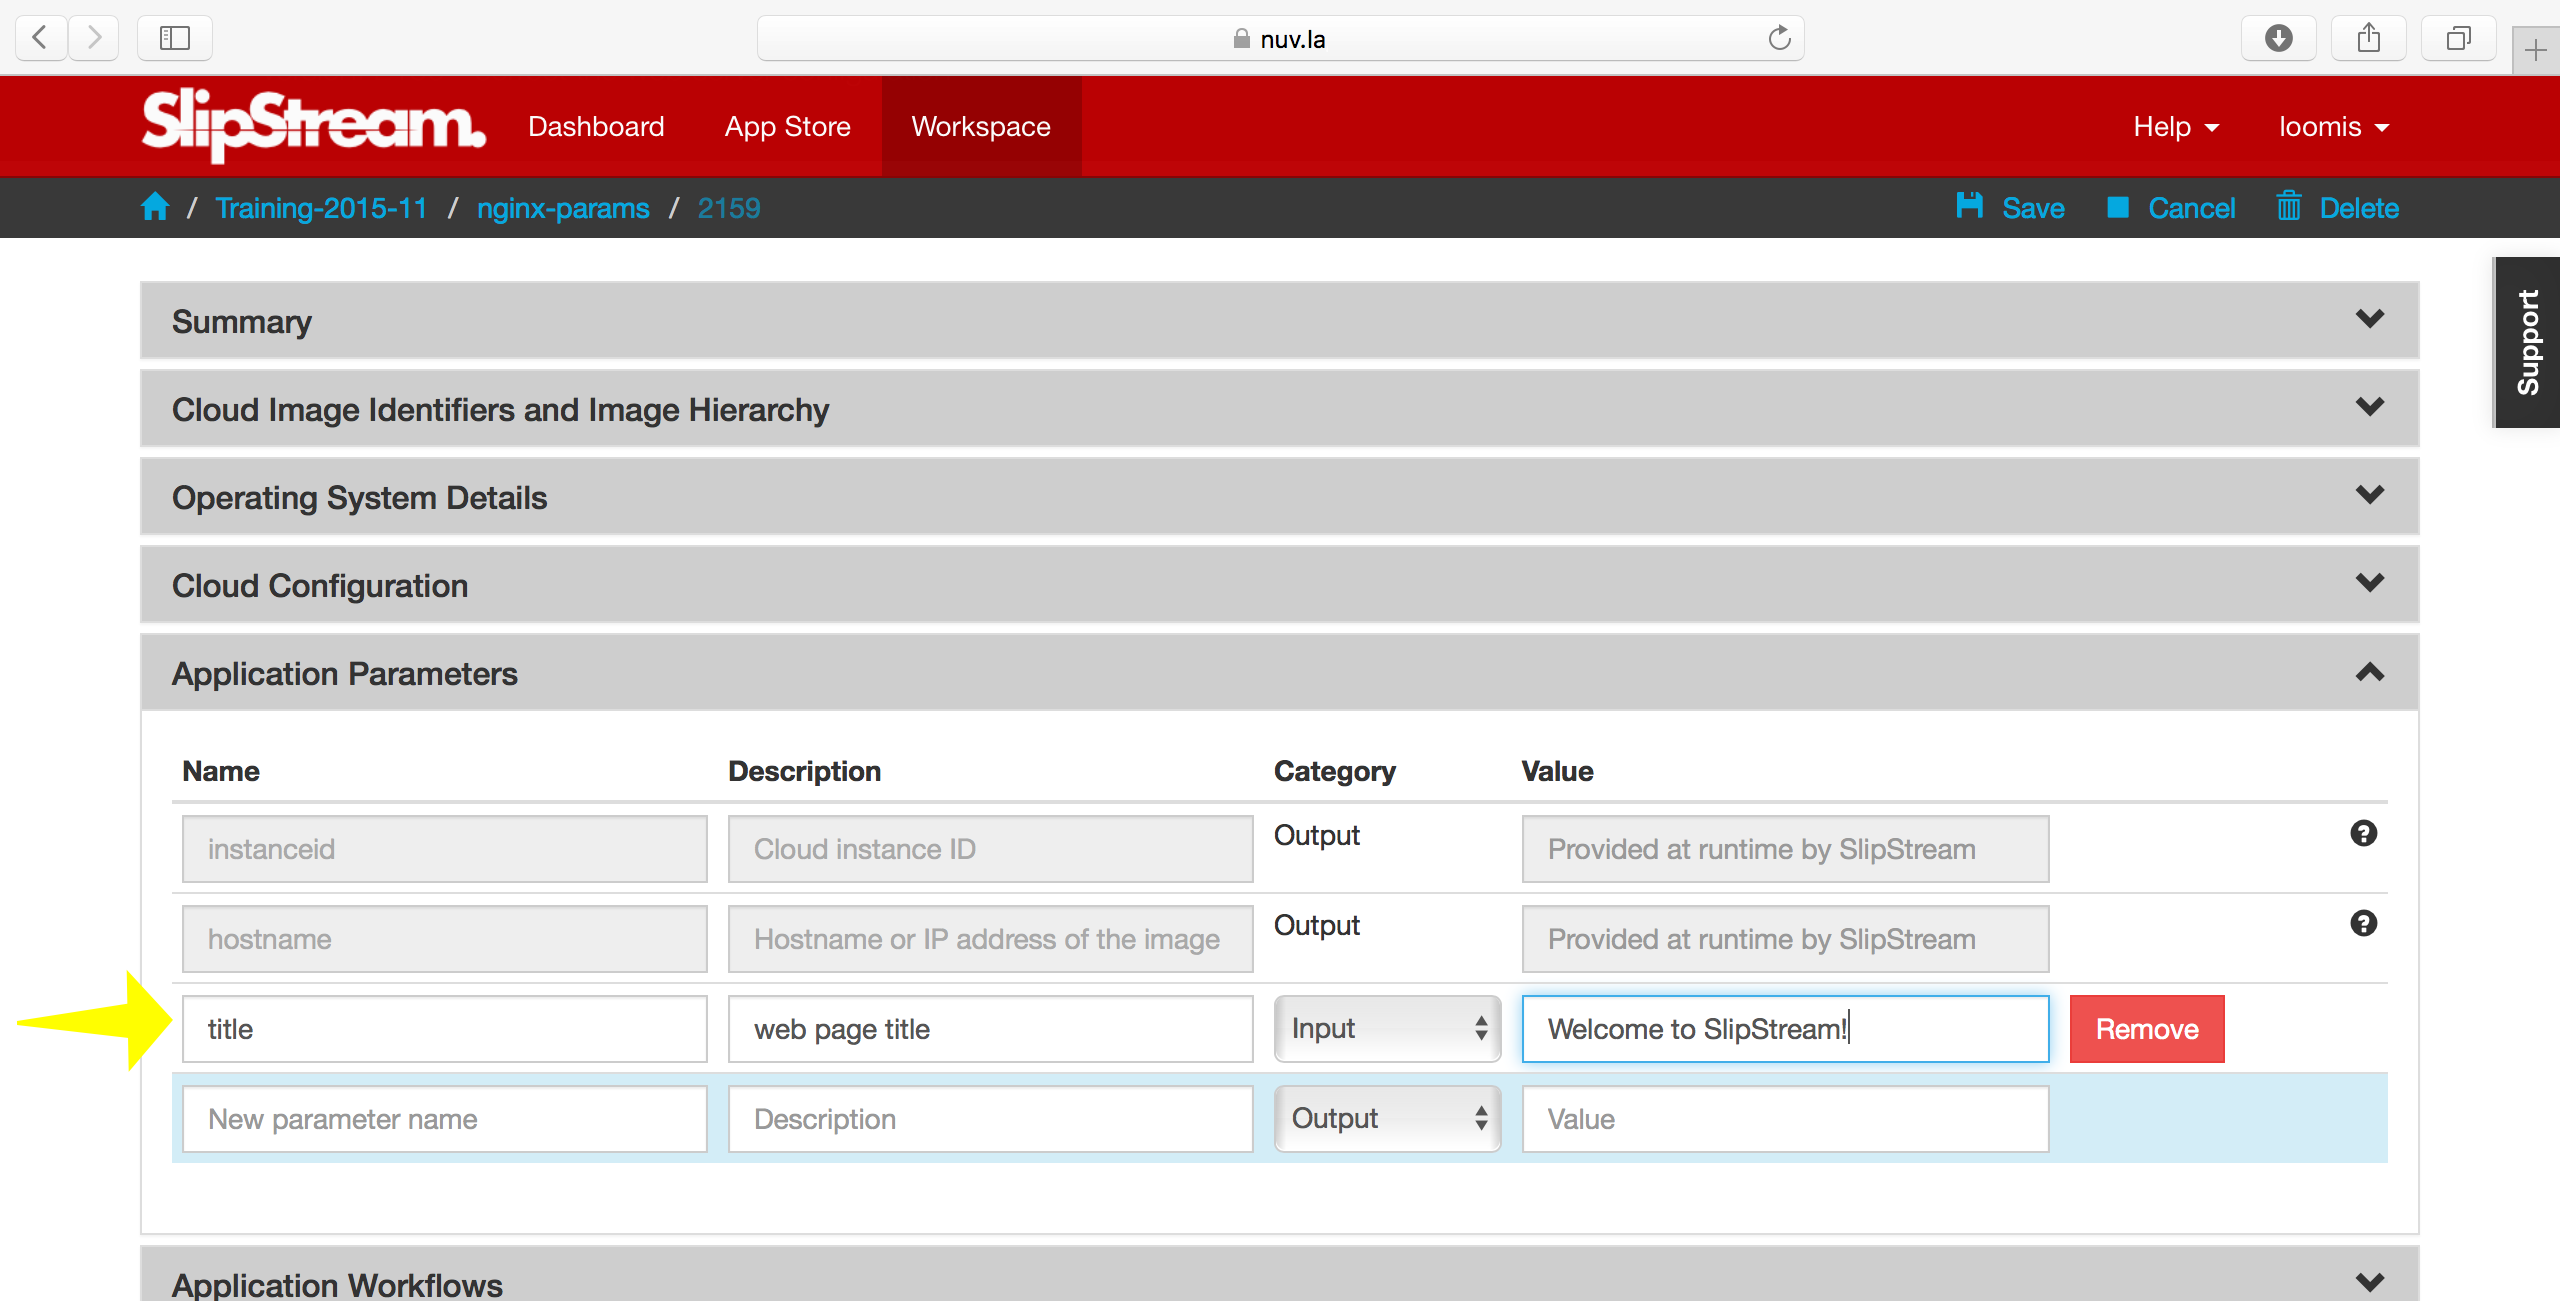
If you provide a value here, that will be the default value used when deploying the component. If you don’t specify anything, then this will force the user to provide a value.
Now we need to modify the recipes to use the value of this parameter in the configuration. Change the welcome page definition in the “Post-install” recipe to this:
<html>
  <head>
    <title>__TITLE__</title>
  </head>

  <body>
    <h1>__TITLE__</h1>
    <p>An nginx server deployed with SlipStream.</p>
  </body>
</html>
We will then replace “__TITLE__” with the actual parameter value.
Deployment Configuration
We must still add some deployment-time configuration in the “Deployment” recipe to take into account the parameter’s value. In the deployment recipe add the following:
#!/bin/bash -xe

# get the value from slipstream
title="`ss-get title`"

# replace the title in the welcome page
sed -i "s/__TITLE__/${title}/g" /var/www/html/index.html

# provide a link to the webserver through slipstream
hostname=`ss-get hostname`
link=http://${hostname}/
ss-set ss:url.service ${link}

# provide status information through web UI
ss-display "Webserver ready on ${link}!"
This uses some magic commands that will be described in the next section. There is also some help for these commands below the editor window in the web interface.
Now you can save the component and deploy it. When deploying it, you should see an input parameter in the run dialog. Change the value so that you can be sure that it was used in the configuration. Verify that it shows up in the welcome page.
In the dashboard, you should see that a service URL has been provided for the web server. This makes accessing the service much easier.

You can also see that an informative message has been displayed on the run page.

And finally, you should also see that the value of your title parameter has been taken into account.

Run Database
When you deploy a component (or later an application), SlipStream creates a mini-database of parameters which can be used to pass information into or out of the running component.
In this run database, there are some global variables that are always
defined. One of these is the ss:url.service parameter, which is
the service URL for the deployed component. The web interface picks
up this value and displays it as a link in the dashboard and run
page. All of the global variables are prefixed with ss:.
Note
In general, any parameter that starts with “url.” will be interpreted by the web interface as a link and rendered as such. In addition to the service URL, there are also similar ones generated by default for SSH.
The ss-display command is a shortcut to set the statecustom
parameter on a particular machine. You’ll find this in the section
for the machine on the run page. Notice that the input parameter we
defined for the title, also shows up in the parameters of the machine.
As seen above the hostname is automatically defined by SlipStream
for each node. This can reliably be used to recover the hostname of
the machine running the recipe.
The commands such as ss-set, ss-get, etc. are installed
automatically by SlipStream on the machine and can be used in the
deployment recipe.
Warning
The ss-* commands are installed at the end of the post-install
recipe. They cannot be used in the recipes that are executed
earlier.
Secured Web Server
Enhance the web server to also serve a protected page that can only be accessed with a username and password. To do this you need to:
- Create a page that we want to protect,
- Modify the nginx configuration to use basic authentication,
- Create the credentials to access the page.
You’ll need a utility from Apache to generate a username and password for the protected content. Add the package “apache2-utils” to the “Install packages” recipe.
In the “Post-install” recipe, update the server configuration:
cat > /etc/nginx/sites-enabled/mysite <<EOF
server {
  listen 80 default_server;

  root /var/www/html;
  index index.html;

  location /protected {
    auth_basic "Restricted";
    auth_basic_user_file /etc/nginx/htpasswd;
  }
}
EOF
Add an empty password file and create a protected page:
# create empty password file
touch /etc/nginx/htpasswd

# provide a page with a secret
mkdir -p /var/www/html/protected
cat > /var/www/html/protected/index.html <<EOF
<html>
  <head>
    <title>SECRET</title>
  </head>

  <body>
    <h1>SECRET</h1>
    <p>This is a protected page; username and password required.</p>
  </body>
</html>
EOF
Update the deployment script to generate a random password:
# create an entry in the password file
username='nginx-user'
password=`ss-random`
htpasswd -bc /etc/nginx/htpasswd ${username} ${password}

# publish this information in slipstream
ss-set username ${username}
ss-set password ${password}
Notice that this publishes the username and password as parameters into SlipStream. You must define those parameters in the component definition or the deployment will fail. Add the “username” and “password” output parameters in the “Application Parameters” section.
This can now be saved and deployed. When it is available you should be able to see the old welcome page and see the secret page at http://host_ip/protected/ if you provide the username and password. The values of those will be published in the parameters on the run page.
Note
As generating a password is fairly common for securing services,
the SlipStream client provides the ss-random command to
facilitate this. Generating a password like this, allows the
running instance to be accessible only to its owner, while the
component definition can be shared.
EXERCISES
- Create the simple web server and verify that it works.
- Parameterize the web server and verify that you can change the title through the input parameter.
- Secure a part of the web server and verify that this protection works as expected.